How i fitted the Raceland induction kit...Guide

  1. #1
    There seems to be alot of people asking how to fit this kit at the moment.

    The kit itself is excellent quality and with the green upgrade from Kamracing is well worth it.

    As it comes with no fitting instructions or brackets to fit alot of people seem to have a problem getting it to fit correctly.

    It took me a while as well but after fannying around i managed to get it to fit absolutley bang on.

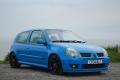
    The pictures below show how i went about fitting it to my Mk1 silvertop VTR.

    Enjoy!.

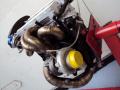
    Front pracket attached to slam panel


    Bracket for the front. See how it is attached to the slam panel. I used an exsiting hole and the thread from the original induction system.


    Middle bracket. it is attached to where the original induction system bracket was located


    Middle bracket again


    Powersteering Bottle relocation. I used the bracket that comes with the raceland kit for this.


    Powersteering bottle bracket again, so you can see how it is attachd to the alarm siren.


    Throttle body attachement. i used some of the OEM induction system pipe (the corregated part) as it allows the pipe to move with the engine when you are on and off the throttle. This stops the induction system being broken at the slam panel. This seems to be a common problem with this type of induction kit, using this bit of pipe stops that.


    The system fitted


    The brackets i made from bits that i found just laying around my garage. It wasn't very difficult to get them into the right shape. a big hammer and constantly checking to make sure they fitted correctly. I had to twist them so that they located correctly on the induction kit (i used a set of pliers but i really wish i had a workbench clamp!). I also used a grinder to cut away some of the bracket where it was fouling on the induction kit. Took about 1 hour to do this. I could have tidied them up a bit and made them sit a bit flatter but to be honest they work fine like they are now and there is no need to do it now its fitted.

    I should really make another bracket to attach to the other side of the induction kit at the front but the other brackets are very stiff and hold it just where i want it. It has about a 2cm gap from the top of the radiator so no danger of it melting.
  2. #2
    Very Good guide!


    But do you have to have the extra pipe to go from the kit to the Throttle body, doesnt it come with something that connexts the two?
    Thanks OllY
  3. #3
    Good guide there mate im sure this will help a few people out.
    Raceland looks good to.
  4. #4
    Olly,

    It comes with some rubber tubing that is just a little bit to short.

    I used some of the original OEM induction system tubing because it was just what i needed for the job and i didn't want to go splashing out on some silicone hose for the sake of a few centimeters of pipe.

    Basically i cut some off the rubber tubing that comes with the kit and attached it to the throttle body then attached the OEM pipe to the rubber bit, then attached that to the other half of the rubber tube. I then attached the whole thing to the metal induction tube from the enclosed bit.
  5. #5
    Great guide mate! 1 Question:

    Where the silver tubing meets the filter (inside the scoop) did you have to put a jubilee clip on it to keep it secure?
  6. #6
    there are 4 clips on it.

    1 - At the throttle body to keep it attached.
    2 - On the bit of rubber tubing that attaches the OEM pipe to the rubber bit on the throttle body.
    3 - On the OEM pipe to attach it to the other half of the rubber pipe.
    4 - On the rubber pipe to attach it to the metal tube from the enclosed part.

    I definatley needed all 4 as i didn't want to be checking it all the time to make sure that it was all still connected properly. this way once they are all fastened up tight you can leave it alone.
  7. #7
    And to answer your original question. yes. i used the hose clip to secure it onto the tube inside the scoop
  8. #8
    very helpful and good guide raceland induction kit looks nice
  9. #9
    Quote:
    Originally Posted by banx22 View Post
    Olly,

    It comes with some rubber tubing that is just a little bit to short.

    I used some of the original OEM induction system tubing because it was just what i needed for the job and i didn't want to go splashing out on some silicone hose for the sake of a few centimeters of pipe.

    Basically i cut some off the rubber tubing that comes with the kit and attached it to the throttle body then attached the OEM pipe to the rubber bit, then attached that to the other half of the rubber tube. I then attached the whole thing to the metal induction tube from the enclosed bit.
    Brilliant! Thanks for the help. Very aprishiated!
  10. #10
    Quote:
    Originally Posted by banx22 View Post
    And to answer your original question. yes. i used the hose clip to secure it onto the tube inside the scoop
    Cheers mate, you've been a great help. Repped!
  11. #11
    have u rigged the crank case breather up 2 it? cant realy see in the pics
  12. #12
    steve is it best to do that or put a breather filter on it?
  13. #13
    nice thread mate ive just got mine an this is a big help cos i didnt realy have a clue
  14. #14
    i thought that if you bolted it to the slam panel then with the movement of the engine it scracked the casing?
  15. #15
    Quote:
    Originally Posted by 355858 View Post
    steve is it best to do that or put a breather filter on it?
    i can just about see it in the pic it should be ok as long as it doesnt come off, you dont want any crap getting in
  16. #16
    Quote:
    Originally Posted by 355858 View Post
    steve is it best to do that or put a breather filter on it?
    imo some rubber piping would be a safer beat than using the original piping.
  17. #17
    good guide, now the big question have you noticed a difference in performance that is the question to be answered.

    BTW on ebay you can now get these without vts vtr in them just carbon look
  18. #18
    Top guide mate, just got the same Raceland/Green for my S, haven't fitted it yet but this week going to hopefully get stuck in and do it (just after I have it on the rollers totally standard)
  19. #19
    Steve.

    The crank case breather has been cable tied out of the way with a breather filter on it. I followed the pipe and it seemed to be connected to the inlet manifold, it was sucking in air not blowing it out so i figured that it would be better to suck in its own air rather than from the induction system. if yo mean the rocker cover / oil breather pipe then that is plumbed back into the induction system.

    Mark,

    If the pipe that attached to the throttle body was stiffer, that wouldn't move with the engine, the whole induction system would, hence why they crack at the slam panel as usually that is where they are attached to the car other than the throttle body. With the pipe being flexible on mine only the pipe will move about with the engine, not the induction kit, therfore no cracking at the slam panel as no stress is being put on it.

    Performance wise. yes you can notice it. It pulls better lower down the rev range and feels a bit less restricted. It is not a massive difference by any means but you can certainly tell that it is better than the OEM system. also the sound under hard acceleration is much deeper, not boomy though.
  20. #20
    Hi there, just purchase one of these babys formy vtr, seems straight forward but what the hell doyou do with thehose from the idle actuator?? as this fits onto the original hosing like the rocker cover breather and this kit has no fitting for it.
    HELP!!!!
  21. #21
    I just put a breather filter on it and cable tied it out of the way. It sucks air in so their is no need for it to be on the induction system.

    Just make sure that you put a filter on it. You don't want any particles going into it as if its not on the induction system then it is sucking in un-filtered air straight into the induction manifold which could cause some damage to the engine. only need a cheap one. I picked on up from halfruads for £8.
  22. #22
    where have the pics gone?
  23. #23
    can some one put a new guide up, im wanting to know this too, the vtr one to a mark 2 would be helpful
  24. #24
    anyone? Just need to pictures as Im going to attempt to fit mine on sunday!
  25. #25
    I'm going to try fitting mine tomorrow, I seem to be missing some metal bits to hold in in place thou?
  26. #26
    put some pics up of how you 'tried' then !
  27. #27
    pics have gone , i want to know how this fits on a vts
  28. #28
    theres getting some demand now !
  29. #29
    Did not get chance to fit it today, will try in the morning.

    I need some kind of brackets by the look of it, for nearly £100 I would at least expect some kind of instructions, and at least all the right parts to fit it..
  30. #30
    pictures arnt working anymore
  31. #31
    I really need this aswell.

    Weather permitting me and me padre are going to have a go at fitting it tomorrow, if it goes well Ill post pics.
  32. #32
    could do with having the pictures back. seems like its be a good guide with them!
  33. #33
    Yeah pics plz!
  34. #34
    erm, is it me or are the pictures not working?
  35. #35
  36. #36
  37. #37
  38. #38
    pictures would be nice
  39. #39
    The pictures have been deleted from my photobucket account so they won't show up anymore.

    The kit is quite straighforward to fit, just that you really need to have some brackets made so that you can stop it from resting on the top of the radiator.

    It can only be fitted on way so you can't go wrong really.

    To be honest the kit made no difference what so ever to the performance of the VTR. it sounded nice but other than that nothing.
  40. #40
    other people have said different though..

    can you not upload the pics back up ? its slightly different fitting to a mk2 i think too.
  41. #41
    please put the pics up again!
  42. #42
    yeah put the pics back up please!!!
  43. #43
  44. #44
    pictures would be best as everyone will know how to fit it then.
  45. #45
    good guide mate cheers....pics please???
  46. #46
    good guide wish i could use it CANT FIND A CHEAP MANIFOLD lol.
  47. #47
    good thread m8
  48. #48
    Quote:
    Originally Posted by pritchard9025 View Post
    good thread m8
    how? theres no pictures
  49. #49
    the demand for this guide or another guide is un'canny, surely some one must be able to put us sax-pers out of our misery
  50. #50
  51. #51
    any chance of pics, c'mon you know you want to...
  52. #52
    bumping this up, as i still wanna see pics, or get a guide from someone else !
  53. #53
    OMG OMG OMG OMG OMG OMG
  54. #54
    http://www.saxperience.com/forum/sho...d.php?t=118619

  55. #55
    You sir are a god
  56. #56
    We aim to please

    Matt