Well as some of you know I got myself a Rallye blue carpet so decided today to start stripping the saxo.here is a simple guide for you to help those who may not have the knowledge or the confidence to try this themselfs.
STAGE 1
Empty everything from the car (i.e car mats, paper work etc etc)
Get all your tools ready I have used the following
Ratchet with an extention bar and a T30 Torx adapter.
Full spanner set from sizes 6 upwards (dont worry you wont need all of them ok)
stanly knife (for cutting the carpet)
pic is just to show those who may not know what a ratchet and a T 30 end maybe

STAGE 2
Look down the side of the first seat you will see two bolts remove those by using the ratchet and the T30 in all htere are 4 bolts the outer bolts are longer then the inner ones ok (once bolts removed what I have done is put the drivers side bolts etc etc into the doorcard and the same goes for the passengers side this way you know where all the parts are to put them back in )
)

as I have harnesses fitted I can only show you how I removed my eye bolts ok (for thsoe with normal seats where my eye bolt is you should see a bolt there remove it and remove the black bar that holds your seat belt in)

STAGE 3
Remove your rear bentch (lower back seat) and you will see the brackets that hold the seat in place remove the bolt on both brackets with a 13m spanner.once again put the parts into the doorcard for safe keeping.

STAGE 4
now remove the first seat

once you have done that remove the Bolts under the dash VERY EASY TO FIND TO BE HONEST!

You will find the following nuts/bolts undeer the dash near the doors drivers side is easy to take out passenger side can bea pain due to the bonnet release latch is in the way a bit.

STAGE 5
Now all the bolts have been removed carry on as normal and remove your second seat REMEBER VERY IMPORTANT) unplug your pre tensioner air bag plug before removing the seats.for those with normal saxo seats you must removed teh playsic bit on the side of the seat which is a cover hiding most of the pre tensioner the plug is in orange! also remove your gaiters if you have any on the hand brake or gear stick.

STAGE 6
once that has been achived proceed and remove the centre consol you will need your torx set out again (cant remeber off hand what the size was but I will update thsi how to guide with all the sizes).
once you have removed the centre consol look at your ash tray look right under the dash and you will see two metal bars you will now need the stanley knife cut the carpet from the two bars all the way under the dash.dont be worried about cutting the carpet this must be done to remove the carpet.

STAGE 7
Now comes the elbow grease pull the carpet out with all your might LOL and you will end up with the inside of your saxo looking like this

pic of the old carpet and pic of carpet to go in
(new carpet is alot cleaner now as i have machine shampoo'd it)
OLD

NEW

for those who want to sound proof there saxo's now is the perfect time to add Sound proofing to the floor. idea of what to purchase
http://cgi.ebay.co.uk/E-Dead-Origina...QQcmdZViewItem
Anotehr thing which can be done whilst the carpet is out is if you have a sound system this is a prime time to fit al lthe cables etc etc.
SMALL GUIDE TIME!
before you even think of fitting the cables have ready a tourch and tie wraps
STAGE 1
Look under the passenger side of your dash and you will see a rubber grommet with cables running throught it this is where you will run your power cable through INSTEAD of the lazy way of just run it via the arch!
I used a flat headed screw driver to prize the grommet out a bit instead of cutting into it.

The grommet from an engine bay point of view is on the left side of the master cylinder/brake fluid resoviour.

to put the cable through the whole tape the cable to a straighten out hanger.

STAGE 2
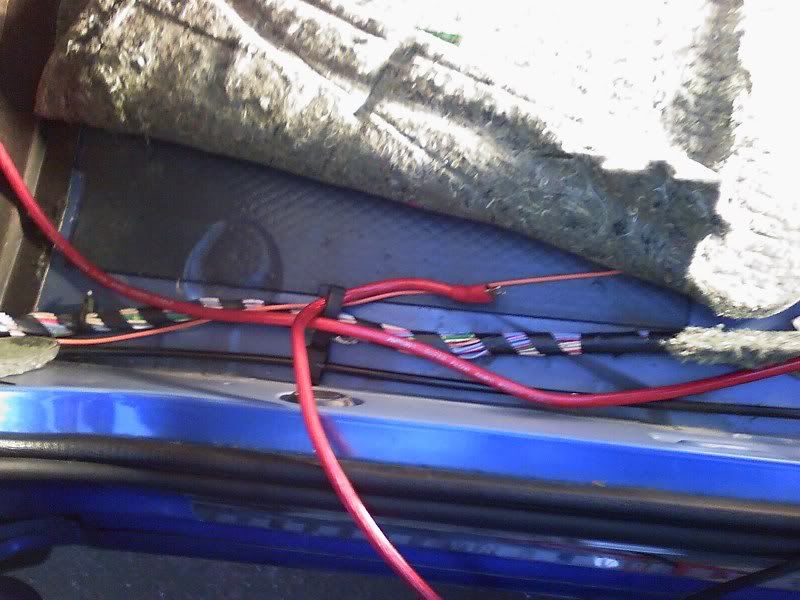
once this is done remove hanger from cable trace the cable down the passenger side of the car you will find there is a buntch of cables all together and there is a black clamp holding them together.. well your power cable can go into that clamp once you have done that cable tie teh cable to the black cable which leads to the rear bentch once you have done that trace cable to the boot of your car to the amp.
THIS IS ALL I HAVE DONE SO FAR BUT THIS GUIDE WILL BE UPDATED TOMMOROW AS I AM FINISHING IT ALL OFF.
things I will be adding is
Fitting of the new carpet
puting audio cables into amp etc etc.
STAGE 1
Empty everything from the car (i.e car mats, paper work etc etc)
Get all your tools ready I have used the following
Ratchet with an extention bar and a T30 Torx adapter.
Full spanner set from sizes 6 upwards (dont worry you wont need all of them ok)
stanly knife (for cutting the carpet)
pic is just to show those who may not know what a ratchet and a T 30 end maybe
STAGE 2
Look down the side of the first seat you will see two bolts remove those by using the ratchet and the T30 in all htere are 4 bolts the outer bolts are longer then the inner ones ok (once bolts removed what I have done is put the drivers side bolts etc etc into the doorcard and the same goes for the passengers side this way you know where all the parts are to put them back in
)as I have harnesses fitted I can only show you how I removed my eye bolts ok (for thsoe with normal seats where my eye bolt is you should see a bolt there remove it and remove the black bar that holds your seat belt in)
STAGE 3
Remove your rear bentch (lower back seat) and you will see the brackets that hold the seat in place remove the bolt on both brackets with a 13m spanner.once again put the parts into the doorcard for safe keeping.
STAGE 4
now remove the first seat
once you have done that remove the Bolts under the dash VERY EASY TO FIND TO BE HONEST!
You will find the following nuts/bolts undeer the dash near the doors drivers side is easy to take out passenger side can bea pain due to the bonnet release latch is in the way a bit.
STAGE 5
Now all the bolts have been removed carry on as normal and remove your second seat REMEBER VERY IMPORTANT) unplug your pre tensioner air bag plug before removing the seats.for those with normal saxo seats you must removed teh playsic bit on the side of the seat which is a cover hiding most of the pre tensioner the plug is in orange! also remove your gaiters if you have any on the hand brake or gear stick.
STAGE 6
once that has been achived proceed and remove the centre consol you will need your torx set out again (cant remeber off hand what the size was but I will update thsi how to guide with all the sizes).
once you have removed the centre consol look at your ash tray look right under the dash and you will see two metal bars you will now need the stanley knife cut the carpet from the two bars all the way under the dash.dont be worried about cutting the carpet this must be done to remove the carpet.
STAGE 7
Now comes the elbow grease pull the carpet out with all your might LOL and you will end up with the inside of your saxo looking like this
pic of the old carpet and pic of carpet to go in
(new carpet is alot cleaner now as i have machine shampoo'd it)
OLD
NEW
for those who want to sound proof there saxo's now is the perfect time to add Sound proofing to the floor. idea of what to purchase
http://cgi.ebay.co.uk/E-Dead-Origina...QQcmdZViewItem
Anotehr thing which can be done whilst the carpet is out is if you have a sound system this is a prime time to fit al lthe cables etc etc.
SMALL GUIDE TIME!
before you even think of fitting the cables have ready a tourch and tie wraps
STAGE 1
Look under the passenger side of your dash and you will see a rubber grommet with cables running throught it this is where you will run your power cable through INSTEAD of the lazy way of just run it via the arch!
I used a flat headed screw driver to prize the grommet out a bit instead of cutting into it.
The grommet from an engine bay point of view is on the left side of the master cylinder/brake fluid resoviour.
to put the cable through the whole tape the cable to a straighten out hanger.
STAGE 2
once this is done remove hanger from cable trace the cable down the passenger side of the car you will find there is a buntch of cables all together and there is a black clamp holding them together.. well your power cable can go into that clamp once you have done that cable tie teh cable to the black cable which leads to the rear bentch once you have done that trace cable to the boot of your car to the amp.
THIS IS ALL I HAVE DONE SO FAR BUT THIS GUIDE WILL BE UPDATED TOMMOROW AS I AM FINISHING IT ALL OFF
.things I will be adding is
Fitting of the new carpet
puting audio cables into amp etc etc.