First of all the adjustment pocedure involves removing the torsion bars, setting both trailing arms to the correct height then re inserting the bars. ensuring the splines are properly engaged, sounds easy rite? lol
Heres a simple way to do it in 10 steps
1. Juch the back end up puting axel stands under the sides of the car.
2.remove the wheels ( loosen the wheel nuts before you jack the car up).
3. then remove the anti- roll bar plates, one on each side then remove the anti-roll bar.
4. remove the damper and fit a dummy damper ( height you want to lower).
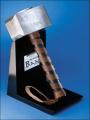
5. Remove the cover from the torsion bars ( on both sides).
6.Remove the driverside torsion bar and turn it ANTI-CLOCKWISE one spline and reinsert.
7. remove the pasengerside torsion bar and turn it one turn CLOCKWISE.
8. refit Your antiroll bar now and check everythings tight.
9. Now You can change your dampers, i stongly recomend you do.
10. refit wheels and drop off the jacks and stand back and admire your work.
This is only a tread for lowering the rear end not adjusting the rear break sensor i think its called whitch activates more the more you lower the rear end.
Click Thanks Please
Heres a simple way to do it in 10 steps
1. Juch the back end up puting axel stands under the sides of the car.
2.remove the wheels ( loosen the wheel nuts before you jack the car up).
3. then remove the anti- roll bar plates, one on each side then remove the anti-roll bar.
4. remove the damper and fit a dummy damper ( height you want to lower).
5. Remove the cover from the torsion bars ( on both sides).
6.Remove the driverside torsion bar and turn it ANTI-CLOCKWISE one spline and reinsert.
7. remove the pasengerside torsion bar and turn it one turn CLOCKWISE.
8. refit Your antiroll bar now and check everythings tight.
9. Now You can change your dampers, i stongly recomend you do.
10. refit wheels and drop off the jacks and stand back and admire your work.
This is only a tread for lowering the rear end not adjusting the rear break sensor i think its called whitch activates more the more you lower the rear end.
Click Thanks Please