[Sticky?] How To - Remove Dashboard

  1. #1
    Just written a guide for this in the Premium Members section, thought i'd be nice and copy it across for all you cheapo bums out there


    Before doing any of the below disconnect for battery, if you've got ahead of yourself and done the first two steps and not disconnected it then wait at least 15 minutes before touching the airbag!


    - Remove centre console (stereo out, push buttons out and disconnect, pull heater adjusters off, remove Torx screws 2 in line with the buttons, two under the stereo, one at the bottom, pull free and disconnect looms)

    - Remove steering columns trims (two Torx screws underneath column)

    - Remove airbag (two Torx screws on the back on the steering wheel, will need to turn 90 degress each way to access them)

    - Remove steering wheel (big gold Torx screw under steering wheel, then give it a good tug)

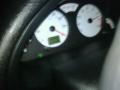
    - Remove dial surround (two Torx screws at the top, possibly two at the bottom?)

    - Remove dials (three Torx screws, two at the bottom, one at the top, then disconnect loom from the back)

    - Remove scuttle panel (two Torx nuts and a cross head screw, nuts are either corner of the windscreen, screw is in the centre of the bulkhead)

    - Remove wiper motor cover (more Torx nuts? can't remember? and unclip off the front edge of the bulk head)

    - Remove wipe motor (first remove wiper arms (nut on each) and pull off, then unbolt motor assembly (bolt either end and one on the front face of the bulkhead))

    - Remove nuts in bulkhead (x3 tucked up under windscreen)

    - Remove bolts (x2 one each side of the dash, found in the footweels bolted through the carpet iirc)

    - Remove screw (below the lower centre console hole, will need to remove lower centre console for easier access, this is done by removing gearstick gaiter, and if you have them, popping out the electric window switches and disconnecting them, then wriggle the console free)

    - Lift dash out (slide it firwards towards the seats until you feel it drop, then ease it forwards and disconnected any additional wiring that is still connected, once the wiring is all free your done! Lift the dash out....happy days!)


    Refitting is the reversal of removing as Haynes like to say


    If i've missed anything, or anyone has any nut/bolt sizes or pictures to add post them up and i'll amend the list!


    James
    4 users thanked this post: , , ,
  2. #2
    Get that stickied.
  3. #3
    Awesome! This is mine for sunday ftw!
    Pics anychance? Would be rad!

    Maybe note you might want to dissconnect the battry before playing with the air bag lol.
    1 user thanked this post:
  4. #4
    Quote:
    Originally Posted by tonto_VTR View Post
    Awesome! This is mine for sunday ftw!
    Pics anychance? Would be rad!
    Could get pics but my car hasn't got its dash fitted at the moment...

    Most if self explanatory once you start, only problem i had as finding the nuts in the scuttle as they are hidden until you peer inside!

    James
  5. #5
    Quote:
    Originally Posted by tonto_VTR View Post
    Awesome! This is mine for sunday ftw!
    Pics anychance? Would be rad!

    Maybe note you might want to dissconnect the battry before playing with the air bag lol.
    Forgot that...mines not had a battery on for month's lol update coming now

    James
  6. #6
    Do you have to take the steering wheel off to remove the dials surround?
  7. #7
    Quote:
    Originally Posted by Rudpud View Post
    Do you have to take the steering wheel off to remove the dials surround?
    No just remove the steering column surrounds

    James
  8. #8
    This is great. Pics would make it though
  9. #9
    Quote:
    Originally Posted by Riiko7 View Post
    This is great. Pics would make it though
    Will add pics when i refit my dash...or possibly grab a few from the 1.1...will see if i get a few minutes spare over the weekend

    James
  10. #10
    Quote:
    Originally Posted by Jim-Bob View Post
    No just remove the steering column surrounds

    James
    Nice one, coz ive heard you can get the paper bits for the front. Like buy em? Thinking bout changing mine lol
  11. #11
    tempted to do mine on the weekend now!
  12. #12
    Quote:
    Originally Posted by scholesyy View Post
    tempted to do mine on the weekend now!
    Haha! Ill be updating sunday! I expect to see you there too!
    If i get too frustrated ill take the angle grinder to it!
  13. #13
    Quote:
    Originally Posted by Rudpud View Post
    Nice one, coz ive heard you can get the paper bits for the front. Like buy em? Thinking bout changing mine lol
    Yeh you can get new ones on ebay

    Quote:
    Originally Posted by scholesyy View Post
    tempted to do mine on the weekend now!
    Sounds like a massive job but take about 45 minutes if your like me and continuously losing my tools

    Quote:
    Originally Posted by tonto_VTR View Post
    Haha! Ill be updating sunday! I expect to see you there too!
    If i get too frustrated ill take the angle grinder to it!
    Lots of pics would be great Tonto! (thought you sold your Sax?!)

    It's an easy job just time consuming as so many other bits have to be removed for access


    James
  14. #14
    Was going to but i needex a cheap runner for xmaas! And now im doing an s conversion next year too! So trying to source the new lump!

    Ill get as many pics as i can! But will be doing it at work!
    If i cant finish it by the end of the day the blow torche will be comming out!
  15. #15
    Nice one james, I assume the Fascias just pull off and you pop the other one on?.

    I could get 140mph ones and make it so it looks like my 1.1 is going 120 instead of 80 or whatever LOLs.
  16. #16
    Quote:
    Originally Posted by tonto_VTR View Post
    Was going to but i needex a cheap runner for xmaas! And now im doing an s conversion next year too! So trying to source the new lump!

    Ill get as many pics as i can! But will be doing it at work!
    If i cant finish it by the end of the day the blow torche will be comming out!
    Top man! Valver's are awesome!

    You could get it done in your lunch break...easy peasy...and no blow torch required!

    James
  17. #17
    Well cant get the air bag out . . . Torques seen to be rounded, gash!...
    Does the steering wheel need to come off to get the dash out! Cant i just work around it?
  18. #18
    Quote:
    Originally Posted by tonto_VTR View Post
    Well cant get the air bag out . . . Torques seen to be rounded, gash!...
    Does the steering wheel need to come off to get the dash out! Cant i just work around it?
    I think so...may be able to move the dash around the wheel?

    If not the extreme thing to do is remove the steering column instead of the wheel before removing the dash...

    James
  19. #19
    im in the middle of doing my heater matrix- only just managed to get matrix clip of the hose, ive took off

    centre console
    wiper motor in scuttle
    steering wheel is off
    dials are out
    ive undone 3 bolts in scuttle panel and 2 in car passenger side and drivers side 13mm bolt. also one in the middle of the dash bolted to there floor- i cant see any more bolts but my dash wont move still ? is there any more hidden bolts you can think of ive missed out ? thanks
    only thing i aint took out is indicator sticks or what they called as not to sure how to take them out- do they need to come out ?thanks
  20. #20
    I cant find the big gold torx screw thats under the steering wheel?
  21. #21
    Quote:
    Originally Posted by Vtralex View Post
    I cant find the big gold torx screw thats under the steering wheel?
    Have you removed the airbag?

    It's impossible to miss, the bolt head is nearly an inch in diameter!

    James
  22. #22
    Pics is a deffo!! and good one!
  23. #23
    Quote:
    Originally Posted by Dane1 View Post
    Pics is a deffo!! and good one!
    Will get pics when i finally get round to refitting my dash

    James
  24. #24
    Excellent...I wanna change my speedo lights....I know how to do it, but would like to know how to do this also!! would be helpful...
  25. #25
    Quote:
    Originally Posted by Dane1 View Post
    Excellent...I wanna change my speedo lights....I know how to do it, but would like to know how to do this also!! would be helpful...
    Just follow the fifth and sixth steps in post 1, then once the dials are out, remove the clear cover (clips all the way round the outside), then mark on the dials the positions of the needles (where the marks can't be seen when reassembled), remove needles and dial face then change bulbs

    I believe the Mk1's had conventional bulbs rather than suface mounted LED's like the Mk2's so should be a fairly easy job (not 100% as i've never had a Mk1)

    James
    2 users thanked this post: ,
  26. #26
    Quote:
    Originally Posted by Jim-Bob View Post
    Just follow the fifth and sixth steps in post 1, then once the dials are out, remove the clear cover (clips all the way round the outside), then mark on the dials the positions of the needles (where the marks can't be seen when reassembled), remove needles and dial face then change bulbs

    I believe the Mk1's had conventional bulbs rather than suface mounted LED's like the Mk2's so should be a fairly easy job (not 100% as i've never had a Mk1)

    James
    Your more than helpful!! I shall press the thanks button!! thanks.
  27. #27
    Quote:
    Originally Posted by Dane1 View Post
    Your more than helpful!! I shall press the thanks button!! thanks.
    No problem mate

    If you have a search around there probably is a guide to changing the bulns in Mk1 dials (never checked but i know theres Mk2 ones about so i guess there the Mk1 equivalents somewhere?)

    James
  28. #28
    I will have a look mate...