DIY wheel painting progress

  1. #1
    I'm going to spray my VTS wheel black and as this is abit of a hot topic I'd get a few pics up of my progress and hopefully help a few people out on the way.

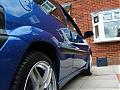
    1, These are what the badboys looked like to begin with, theres a few marks but nothing major:


    This one is probably the worst one out of the lot:


    I set about cleaning them as they were quite dirty after been sat in a scrap yard for two years, i must warn you cleaning wheels is far more dangerous than you realise:


    After surving that near death experience the wheels looked mint:


    I left them on the garden to dry for abit and set about sanding them with some fairly rough sandpaper, I cheated and used a orbital sander but still had to go over the wheels by hand to get the areas the sander missed:


    I'm going to sand them a bit more tomorrow and add some filler where needed.

    I'll continue to update the post as I go and hope to have a base coat by the end of the week.

    Tuesday's to do list = More sanding and some filler action

    *If any of the moderators want me to cut the pics down or lose a few? Then let me know and I'll sort it.

    Cheers

    Steve
  2. #2
    How did you cut your finger, on the wheel?
  3. #3
    Quote:
    How did you cut your finger, on the wheel?
    Yeah there was a chip in the rim and that was the damage it took me 5 minutes to clean the blood of the wheels it went everywhere.

    Blood, sweat and tears (only a few)
  4. #4
    coming on, don't go the lazy route and try jumping grades of sandpaper, as it'll spiol all your hard work.

    and how some things can be so decieving ouch b*****d thing lol
  5. #5
    Thats nearly as bad as what I did to my finger trying to get your wiring sorted!... lol... ripped the skin off behind the nail disconnecting some wiring and then jabbed the point of the electrical tester into my thumb!.... not to mention the manifold burns on both our arms lol!.... your car is LETHAL!
  6. #6
    I've been told its a death trap a few times LOL.

    I'm working my way through the grades, I love sanding its the best!
  7. #7
    I know!... even the little bracket I made to hold the dip stick pipe when you snapped the bolt in the thread! lol... "I'll get the sandpaper on it" lol
  8. #8
    How are you doing it then, down to the old grey primer or back to the metal?

    Iam taking mine back to the metal.

    Getting the top layers off is a piece of piss, getting it down to the metal is abit harder, but hey, will stop any bubbling in the near future. hopefully.
  9. #9
    looking good matey

    forget to tell you to use etching primer
  10. #10
    Coming along nicely, what colour you doing them?

    Edit: just read what colour lol
  11. #11
    Quote:
    How are you doing it then, down to the old grey primer or back to the metal?
    I dont know mate, how far are you suppose to take them back?


    I've been out sanding again today, do they still need more work?????


    Quote:
    forget to tell you to use etching primer
    Is this a halfords jobbie and what's special about it?

    Cheers

    Steve
  12. #12
    anymore progress?
  13. #13
    Quote:
    --------------------------------------------------------------------------------

    anymore progress?
    No I need to know how far back I take them before painting, I'll add some filler to the chips tonight. Hopefully that'll go well.
  14. #14
    I've spent yet another evening with my beloved wheels, I've filled in all the chips,scuffs etc. I whacked the filler on quite thick sanded it down with some corse paper untill it was sitting flush with the wheel then went over it again with finer paper. I'm very impressed with the results.

    Here's a before and after pic of the most damaged wheel:

    B4


    After


    There was quite a hefty chip in the wheel I wasnt sure if I'd be able to cover it but it turned out realy welll:


    I managed to get the first layer of primer on aswell, I piled it on quite thick but well spend a few hours sanding it down and building the layer up gradually.


    A very sucessful evening on the wheel painting front.
  15. #15
    you painted them grey?? nice one
  16. #16
    Nice one ste!... we'll set up business... I'll do the engines, you do the fancy stuff lol

    Quote:
    you painted them grey??
    Its metal primer not paint lol
  17. #17
    Quote:
    Nice one ste!... we'll set up business... I'll do the engines, you do the fancy stuff lol
    That's weird, I just said that to your sister but I saw my role in the company as 2nd hand parts sales as I earn good money through that avenue.

    But if your offering me a job doin fancy stuff I'm more than happy.
  18. #18
    The wheels are going to be black.
  19. #19
    satin black or laquered?
  20. #20
    looking good there mate, have to get my finger out and get mine done soon
  21. #21
    laquered I think but I'm very indecisive so that could change.
  22. #22
    Quote:
    looking good there mate, have to get my finger out and get mine done soon
    It's not a difficult job but time consuming, I'm hoping the paint goes on as well as the primer.
  23. #23
    sean - leave yours silver.........


    please.
  24. #24
    Leave them in primer lol

    I like yours silver too sean
  25. #25
    looking good mate lot of hard work but will be worth it plus fun bar the bloodshed i imagine hehe
  26. #26
    haha Matt and Dan i'm not talking about my vts wheels, i mean my old vtr rims i have in my garage, really like fatsax's car (posi blue, black vtr rims, white tyre writing), so gonna have a bash. i do fancy having a go at refurbing my vts wheels though, in standard silver obviously
  27. #27
    looking good mate
  28. #28
    top effort so far !
  29. #29
    looking good wish my cyclones cleaned up that quick wouldnt it be easyer to remove the valves
  30. #30
    I didn't think about the valves untill it was two late but I'll remove them before I apply the paint and get some new ones when I have the tyres fitted.

    I've got this comma wheel cleaner stuff with all the brushes it does a really good job but it might be a bit harsh for the wheels when there painted.

    I'm getting some more primer later so I'll get sanding and add another layer.
  31. #31
    where do you get the ally primer from i couldnt find any in halfrods
  32. #32
    They are looking great so far mate! definately worth the bloodshed! I will be keeping a keen eye on this thread as im not sure whether to spray mine or not!

    Keep up the good work :Y:
    Alex
  33. #33
    I got it from Halfords mate, but there's loads on Ebay if all else fails.

    You shouldn't have any problems getting it locally though.
  34. #34
    there looking really good mate
    what colour car they going to be going on???
  35. #35
    Cheers mate there going on a Posi blue painted beast.

    I just hope that painted vts wheels dont become the new Lexus lights in a year or so.
  36. #36
    black wheels do look hard as nails...
  37. #37
    I've been messing with the wheels again today, I used some wet & dry action on the 1st cost of primer then did the same for the second coat.

    That was all very successful so I've just applied the first coat of paint:


    The black shows alot more little marks so maybe I should have spent alot more time with the primer but neverless I'm happy with the progress.

    I'm off to Halfords to get some more paint now to finish them off then It's onto the lacquer.

    The paint,primer & paper have come to around £40 in total which is the price most companies wanted per wheel so it's well worth the time and effort.

    It's suprising how good they've turned out considering I'm in my back garden with some rattle cans.

    The joy of DIY!
  38. #38
    quality :thumbup:
  39. #39
    looking good now mate, cant wait to see what they will look like on your car!!!
  40. #40
    like a tractor until its lowered.
  41. #41
    nice job mate. thinking bout doing a diy job myself.

    you seen your grass tho lol
  42. #42
    lookin smart wish i could say the same for mine
  43. #43
    Ha ha wait till Carla sees the paint all over the lawn!... and I hope simba isn't being affected by the fumes.... or is the cat you're next spray project?....lol

    Quote:
    like a tractor until its lowered.
    Well hurry up and get the front done and I may be able to book you into fern motorsport before trax for the rear lol
  44. #44
    I've told Carla the lawn is crop circles nothing to do with me......I'm gonna get Simba sprayed matt black and use him as a chalk board.

    I'll get the front dropped asap
  45. #45
    Looking great so far. Black on blue is the shit, (then again, so is white lol).
  46. #46
    looking good chap.
  47. #47
    Had a disaster today whilst applying the final coat of paint.

    Started spraying as per usual a couple of mins into the action the stupid can started dripping paint so that managed to mess the finish up with nice blobs and speckles all over the wheel.

    So I've had to sand them back once ance again and will have to build the final layer up again.

    On a postive note one of the wheels has had a coat of Lacquer applied and it looks mint!


    Hoping to get them all lacquered tomorrow then I'll continue with my spray fest by doing the rear badges & rear windows in an attempt to get rid of those horrible white marks.

    All good fun!
  48. #48
    get one of these mate : clicky
  49. #49
    Quote:
    get one of these mate : clicky
    I wish i would have known about that bad boy a few days ago it would have made life alot easier.
  50. #50
    After many hours of labour the wheels have just received their final coat of lacquer.

    I'm really impressed with the finish just need to clean the tyres now and get them refitted although the wheels are not going onto the car untill after its been lowered (End of this month).


    etc....
  51. #51
    look very nice mate!
  52. #52
    Nice job mate.
    It looks like you have got a really good finish on them.
  53. #53
    They look amazing for a few rattle cans and some filler.

    Even if i do say so myself.
  54. #54
    there lookin good mate
  55. #55
    Ok steve.... now its time to re-paint my wheels, from dirty white to aquafresh sheen! lol.... they look awesome!...
  56. #56
    You have done a top notch job there mate... how much would you say it cost you in total for all the paint, filler, laquer etc etc..?

    Looking forward to seeing them on your car after it has been lowered :Y:

    Alex
  57. #57
    I spent around £40 on paint but you probably dont need to use as much as me, I laid on loads of layers and just kept sanding them back.

    The filler was £5 and a few sheets of sandpaper.

    I'd budget for £50 and you should have some change.
  58. #58
    looking good mate. should look mint on the car
  59. #59
    they have turned out real well matey! and you saved a packet doing them yourself !
  60. #60
    There all the same colour now that they've dried the above picture gives the impression I've used four shades of black.

    Thanks for the positive comments once again.
  61. #61
    look real sweet. black and blue goes hand in hand...
  62. #62
    brilliant job mate,how low are you going
  63. #63
    I have 35mm will Eibachs I went for quality over looks but the vts engine pushed the front down so I'm hoping it drops a little lower. I'll do the back to match.
  64. #64
    should look good,people say that you shouldnt go down any lower than 40mm because of the handling but iam down 60mm and the handling is really good.
  65. #65
    I dont want to go to low as the roads are awfull round here there full of potholes and speedbumps so I was worried about catching my manifold.

    I also wanted abit of comfort its no fun driving round avoiding every single stones or crisp packet in the road.
  66. #66
    its not that bad
  67. #67
    I'm gettin old I've drove round in stupid cars for years I'm looking for a little bit of luxury nowdays.

    I do love the look of a slammed saxo though.
  68. #68


    had a go at mine how many layers of each did you have to do primer,paint and lacquer
  69. #69
    they look really smart :thumbup: i might have a crack at doing mine myself now
  70. #70
    There looking pretty damn shiney it looks like a good job and I used 3-4 layers of each paint but went abit crazy with the lacquer as I'm paranoid about them chipping.
  71. #71
    oh rite lol only did 2 layers of paint but used 1 can per layer! will do about 4 lacquer tho
  72. #72
    It should be fine. My wheels were quite damaged so that may have accounted for alot more paint.
  73. #73
    They look great matey!
  74. #74
    Saw them in the flesh on Saturday... they've come up realy well and unless you get up realy close you wouldn't know they were a DIY rattle can job!....
  75. #75
    Quote:
    Saw them in the flesh on Saturday... they've come up realy well and unless you get up realy close you wouldn't know they were a DIY rattle can job!....
    Lovin your work!

    I've just got to fit them now.
  76. #76
    I should be a mobile mechanic mate... thats around £30 you owe for replacing that burst bottom hose lol!.... I hope the lowering epic goes to plan.... if not we can get 10 bags of gravel from homebase on the orbital for £15! did mine a treat this afternoon!:

    This is how you lower a car cannock chav style!.... 5 bags for the garden and 5 for the boot lol
  77. #77
    lol loving the lowering!
  78. #78
    Quote:
    This is how you lower a car cannock chav style!.... 5 bags for the garden and 5 for the boot lol
    LOL,

    What I like about this method is its fully adjustable, you just throw a bag out when you want to go abit higher.
  79. #79
    There fitted now and look mint:

    http://www.saxperience.com/forum/showthread.php?t=40926