How To: Converting from Mark 1 analogue dials to Mark 2 digital dials.

  1. #1
    Before I start pretty much all credit goes to 'DeekB' from 106owners where I got the idea from.. but just wanted to clean up his guide a little bit as there were a few inconstancies in it.

    1) Start of by getting a set of mark 2 dials and the loom that they plug into with a good few inches of cable. The loom should come with two connector blocks, one black and one yellow. (connector blocks not pictured)


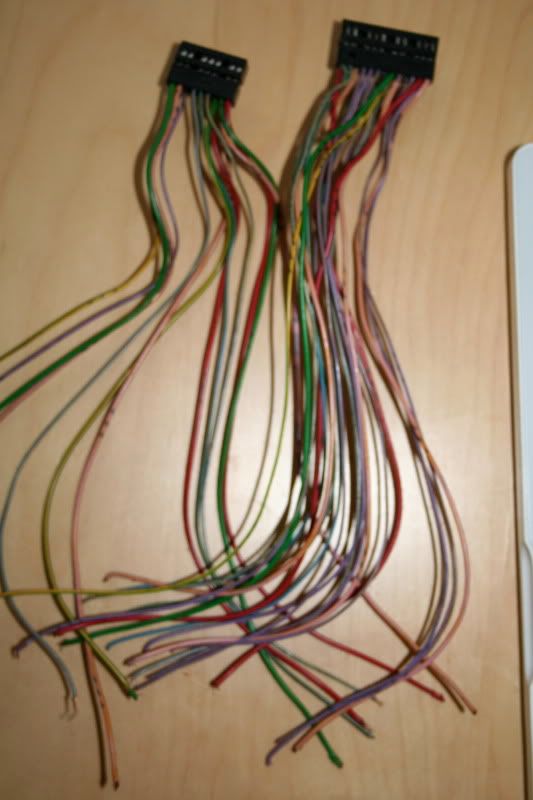
    2) Start by removing the connector block, slide them out, and you can see all the wires are numbered. Now you need to use masking tape or something similar and number each wire near the bare end so its easier to connect them to the corresponding pins on the mark 1 loom later on. (sorry no pictures)

    3) Next get ahold of some Blade connectors, I used 15amp 6.3 connectors and they fit perfectly, quite tight so I know they are not going to come out.


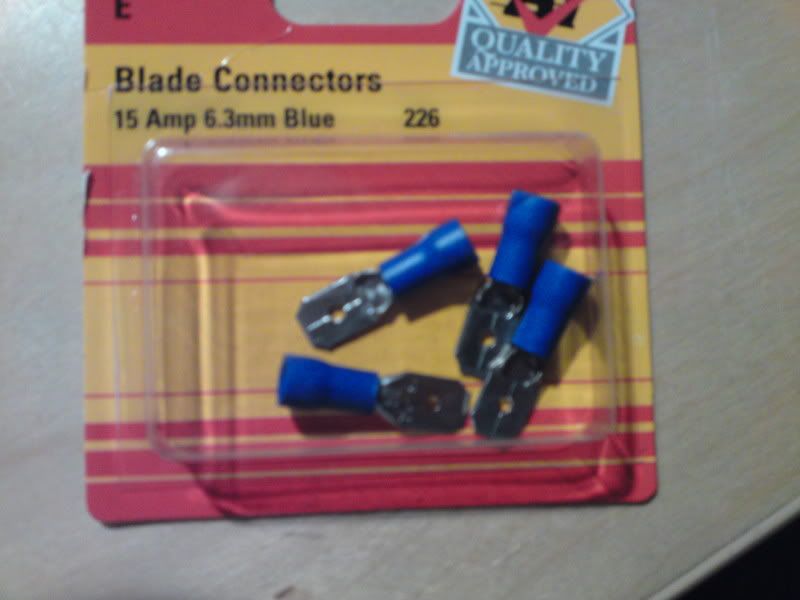
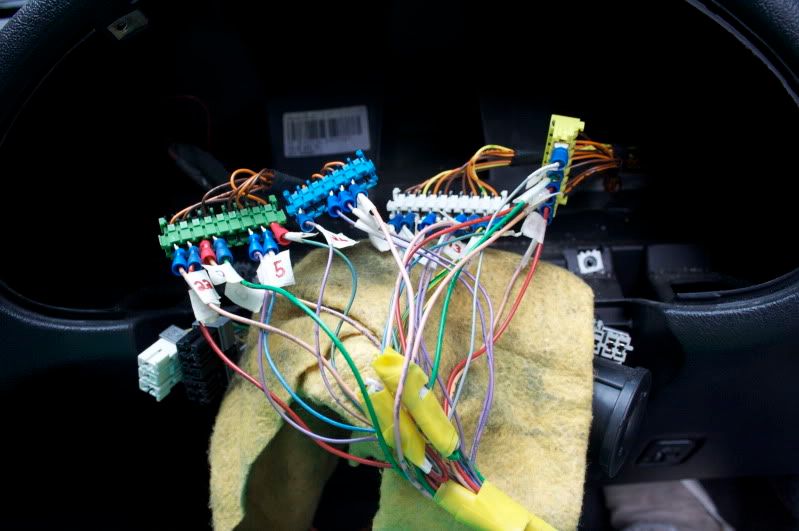
    With these crimp one on the end of each wire, you should end up with something that looks like this:

    *note. There are two sets of wires that need crimping together, please look at the table below to see which ones need connecting together.


    4) Now you need to remove the old dials.. do this by following this guide by 'Mark51' http://www.saxperience.com/forum/sho...d.php?t=170949

    You will end up with 5 conector blocks; Green, Blue, White, Yellow and Brown


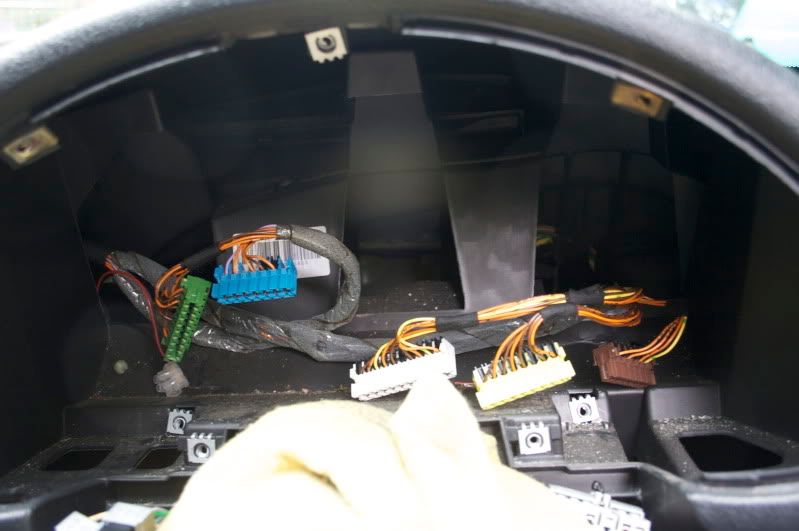
    5) Now you will need to connect the wires from the Mark 2 loom to the corresponding wires on the Mark 1 loom, please use the table to show you which wires connect where.


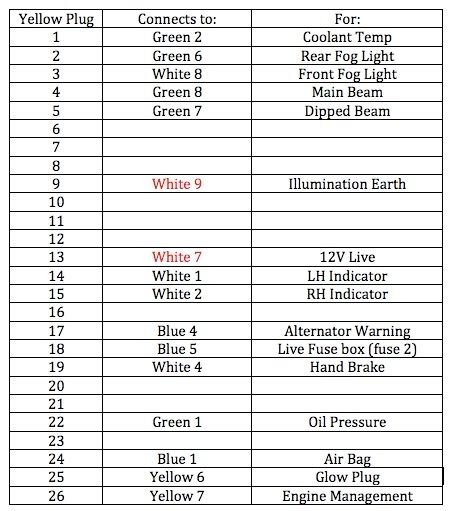
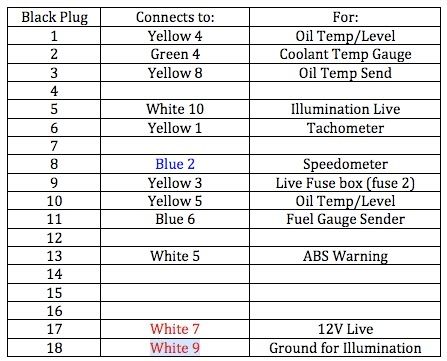
    these wires have multiple connections.

    Depending on the model and year this may have to connect to white 8 instead.

    *There is also another Earth on one of the Mark 2 plugs that will need to earth by connecting it to White 9, but I cant remember which
    wire it is. You can spot it because it will be Yellow and Green in colour.


    6. Now once its all connected up you will notice your fuel gauge will be over reading. There are two options here, one option is to fit a Mark 2 fuel pump or the other is to attach a resistor to the blue 6. I am still working on which size resistor you need but at the moment I took one of the back of my old Mark 1 dials that attaches to the fuel gauge and the level seems to be about right but I will update when I can confirm this.


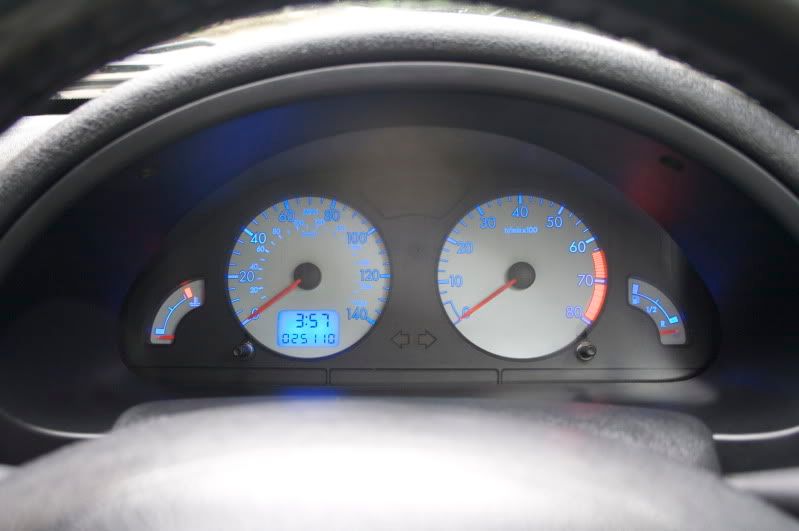
    Once you have connected all this follow the guide by 'Mark51' again but backwards to replace the steering column and then sit back and admire your new mark 2 dials.

    7 users thanked this post: , , , , , ,
  2. #2
    Awesome guide brother, you doing/done this on your MK1>2? I always wanted to get this done on my Westy.
  3. #3
    Quote:
    Originally Posted by Ben View Post
    Awesome guide brother, you doing/done this on your MK1>2? I always wanted to get this done on my Westy.
    Yea, iv just finished doing this to mine.
  4. #4
    What did you have to do about the mileage?
  5. #5
    atm I'm just keeping a record of it and going to alter my mark 1 dials acordily for MOT and services. but eventually going to get the millage altered on the digital dials to the correct millage.
  6. #6
    did you ever change the miles?
  7. #7
    Yes. A guy on here did it for me. I really can't remember his username though.
  8. #8
    Did you find out what to do with the fuel guage?
  9. #9
    Quote:
    Originally Posted by Elliott View Post
    Did you find out what to do with the fuel guage?
    Yea, you can either replace the fuel pump or take the resistor off the back of the Mark 1 dials that goes to the fuel gauge and put in place.
  10. #10
    Okay, so my best bet will be to take the resistor off the back of my mk1 dials and put it on the mk2
  11. #11
    Quote:
    Originally Posted by Elliott View Post
    Okay, so my best bet will be to take the resistor off the back of my mk1 dials and put it on the mk2
    Yes, any problems or anything give me a shout.
  12. #12
    double post fail..
  13. #13
    numbers on mark 2 wireing loom are in thousands? how do u no wot number the wires are? cheers
  14. #14
    If you take the caps of the mark 2 wiring loom, on the block connectors all the wires are numbered in single digits.
  15. #15
    excellent guide mate...
  16. #16
    cheers
  17. #17
    I don't have a temp gauge in my dash, that doesn't matter does it??
  18. #18
    Has anyone, used this?
    I've recently done a digital dial conversion on my mk1 VTS and I used my own pin diagram, but checked it against this and they don't match up!?
    I've got my dials in and they work ok using my diagram
    I know that 106 clusters don't all fit and work in Saxos so if this guide is for a 106 that might explain the differences in pin designations?
    Just wondering if this works?
  19. #19
    Everything seemed to work fine on mine on my VTR. I got the pin outs from the Haynes Manual, I was actually wondering about this the other since the Fuel gauge is in a different place on the dials.
  20. #20
    hiya how would you connect a resistor? do you know the type of name or type of resistor are they hard to put on ? and what happens with temp gauge because mk1's just have light on/ light off not a temp dial? does the dial work still ? thanks
  21. #21
    im thinking of doing this because i changed the bulbs to blue on my mk1 but now the fuel gauge wont work just does respond sooo....
  22. #22
    Would this work on a 1999 Saxo Spree???
  23. #23
    hi guys just wondered if i could put a mk 2 in with a rev counter even though my mk1 doesnt have a rev counter?
  24. #24
    Quote:
    Originally Posted by Gavstaa View Post
    hi guys just wondered if i could put a mk 2 in with a rev counter even though my mk1 doesnt have a rev counter?
    You`d need to find the pin on the ecu for the rev counter then run a wire to the instrument cluster.
  25. #25
    Quote:
    Originally Posted by Gavstaa View Post
    hi guys just wondered if i could put a mk 2 in with a rev counter even though my mk1 doesnt have a rev counter?
    Quote:
    Originally Posted by stevo67 View Post
    You`d need to find the pin on the ecu for the rev counter then run a wire to the instrument cluster.
    Should be a straight swap as it was with mine (106)
  26. #26
    on the mk 2 connectors, how do you know which colour wires are gonna be numbered 1-26? much help would be appreciated as i want to get my dials fitted tommorow
  27. #27
    Great guide mate.
  28. #28
    Quote:
    Originally Posted by danbluefrog View Post
    on the mk 2 connectors, how do you know which colour wires are gonna be numbered 1-26? much help would be appreciated as i want to get my dials fitted tommorow
    On the mark 2 wiring loom if you remove the caps all the wires are numbered.
  29. #29
    what about the mileage ? will it be the same once the mk2 is plugged in or will it be the mileage from the mk2 it came from ?
  30. #30
    Quote:
    Originally Posted by craig85 View Post
    what about the mileage ? will it be the same once the mk2 is plugged in or will it be the mileage from the mk2 it came from ?
    it will be the milage thats on the mk2 clocks
  31. #31
    Great guide mate
  32. #32
    hi people, just read this thread as im changing my vtr mk1 to mk2 dials and i removed caps and still no numbers

    any help would be great
  33. #33
    The number should be there, I can't see why they wouldn't be, all the wiring harnesses will be the same so they wouldnt just make one that didnt have number.. look harder?

    if they really aren't there then a good guess would be that pin 1 is the top left.
    Also all the earth wires are green with a yellow stripe so maybe look at the table and you might be able to work out which numbers the wires are in relation to where they appear on the connector block and then fill the rest in.

    For example pin 9 on the yellow connector block is an earth wire so look for the yellow and green wire that corresponds to it being on pin 9, ie if there are 8 wires in front of it, you've probs got the right one.
    1 user thanked this post:
  34. #34
    wired it all in, works fine... but then wen i turn the car off and go to start it again, the gauges dont work

    so i took the dials out and unplugged the black plug and replugged it in again and it works normal.

    but after sum time it does it again :/

    any help greatfuly recived
  35. #35
    Quote:
    Originally Posted by Birddy_VTR View Post
    wired it all in, works fine... but then wen i turn the car off and go to start it again, the gauges dont work

    so i took the dials out and unplugged the black plug and replugged it in again and it works normal.

    but after sum time it does it again :/

    any help greatfuly recived
    Could be a loose wire somewhere, might be an idea to check all your connections to make sure they are solid and that there is no frayed wire or anything that could be causing any issues.

    Failing they the dials could possibly be faulty.
    1 user thanked this post:
  36. #36
    i checked all wires and all seem tight and well connected, FAULTY DIALS ME THINKS!
  37. #37
    just done this mod with change of colour leds all works fine apart from the 2 leds where millage is which isnt to much of a prob but when you turn key the fuel and temp gauge click can see neadles bounce tiny bit then after around 3 secs bounce up to where they need to be ????
  38. #38
    where is the resistor for the fuel gauge on the mark 1 dials??
  39. #39
    Top guide will come in handy.
  40. #40
    Any of you still alive?
  41. #41
    Can anyone help me..? I want to put mark2 dash to my mark 1 but i cant see where and how is connected 5 (old dash) connectors to 2(new) who cable with who is connected... to black connector and yellow ... Sorry for my bad english...