My guide to COMPLETELY removing gear stick play!

  1. #1
    So I've done plenty of research and reading up on the Saxo gear linkage system, and having done quite a lot of work on my VTS today thought I'd put up some info and pictures to help anyone who had the same problem I did.

    First off for anyone who isn't familiar with it, here's an overview of the Saxo gear linkage:


    The reason there are so many problems with floppy gearsticks is that every single link and ball joint in the above diagram is prone to wear. The main culprits are normally:

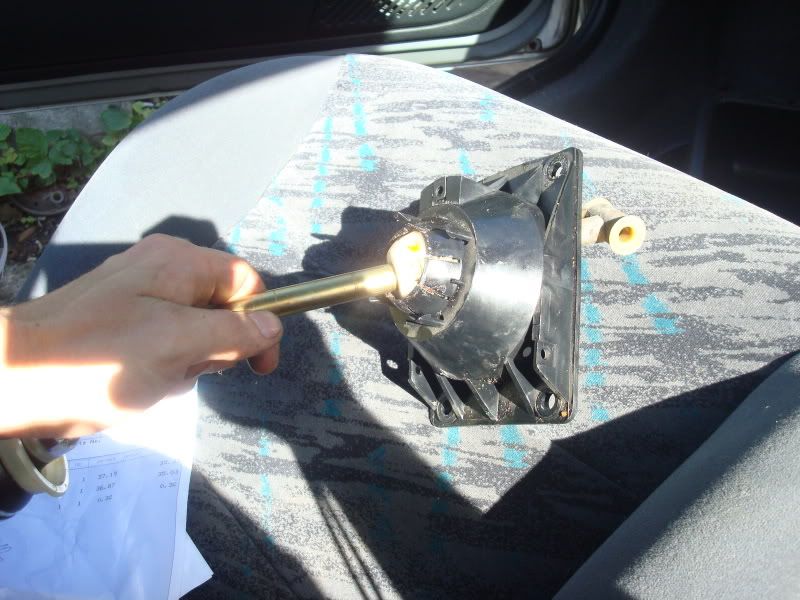
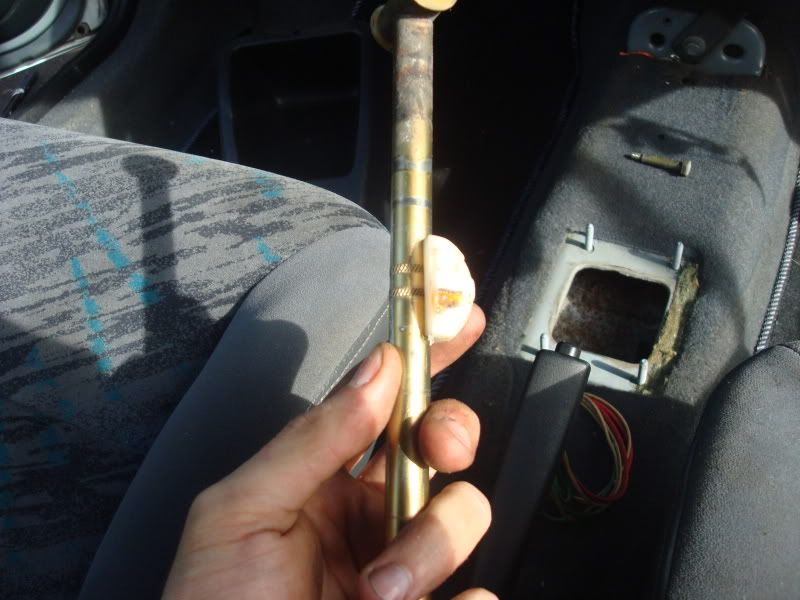
    The large circular bush on No. 1, Selection Bar Part No. 2414A7 £36.87 +VAT
    The spherical nylon ball on No. 2, Control Return Part No. 244965 £37.19 +VAT
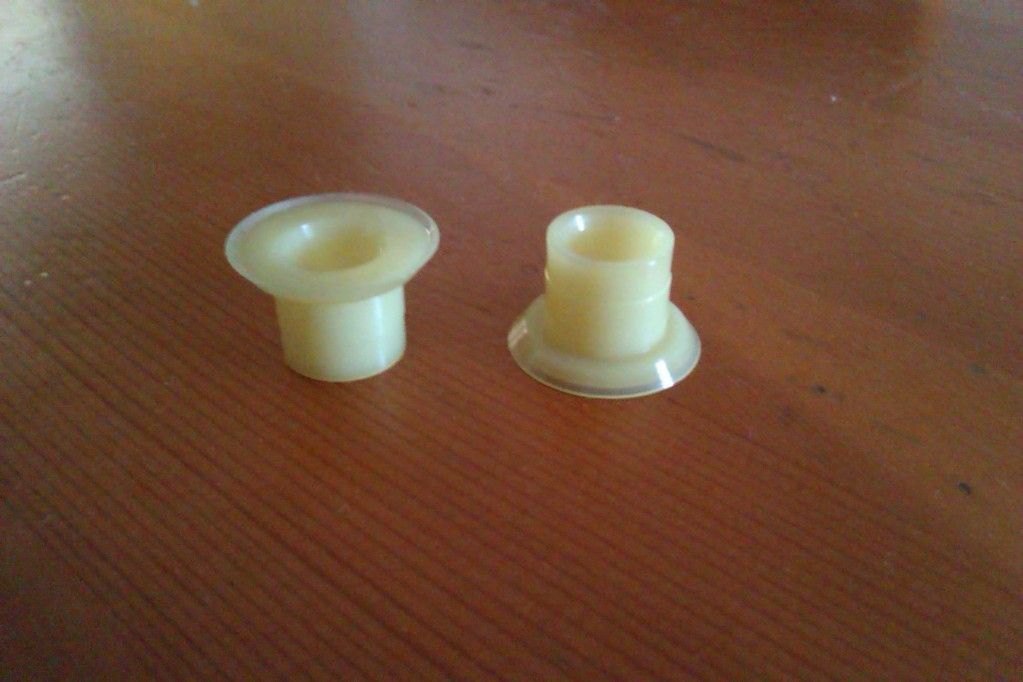
    The socket cups on No. 4, 4 and 5, gear rods. Don't have a part no. for these as uprated replacements are widely available from the likes of Kam Racing/Pug1off from £39.00 which is cheaper than main dealer prices.
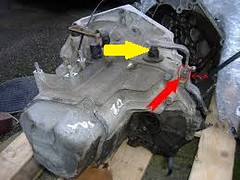
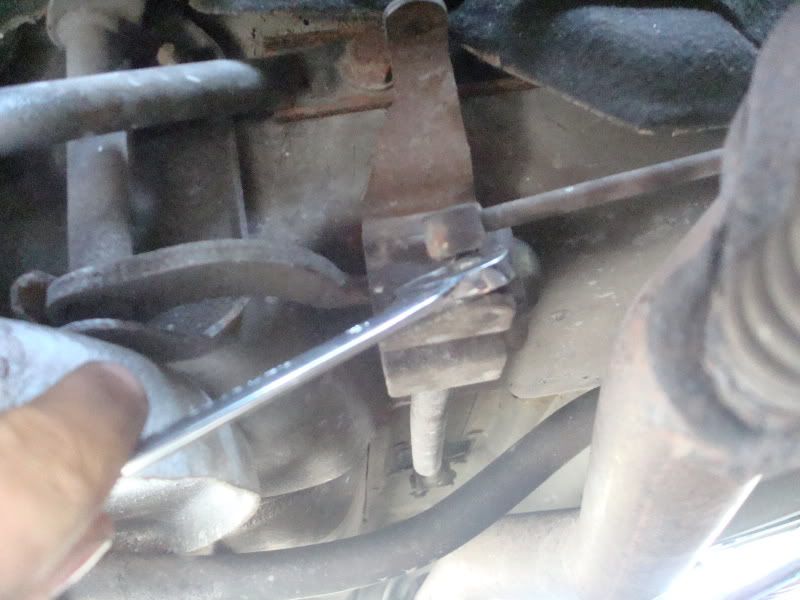
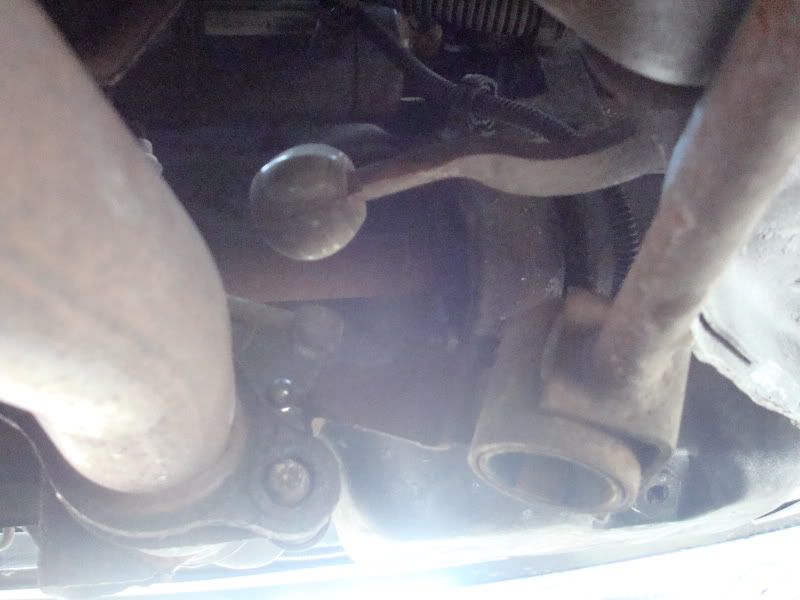
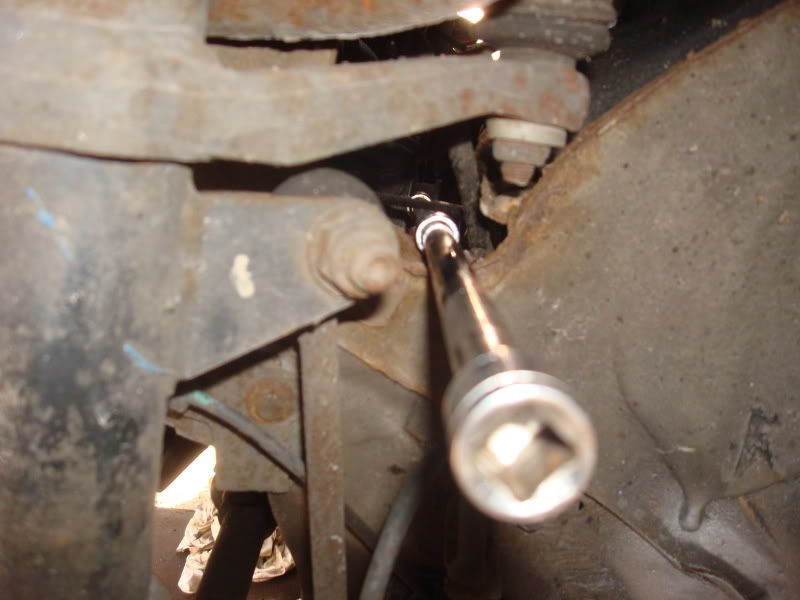
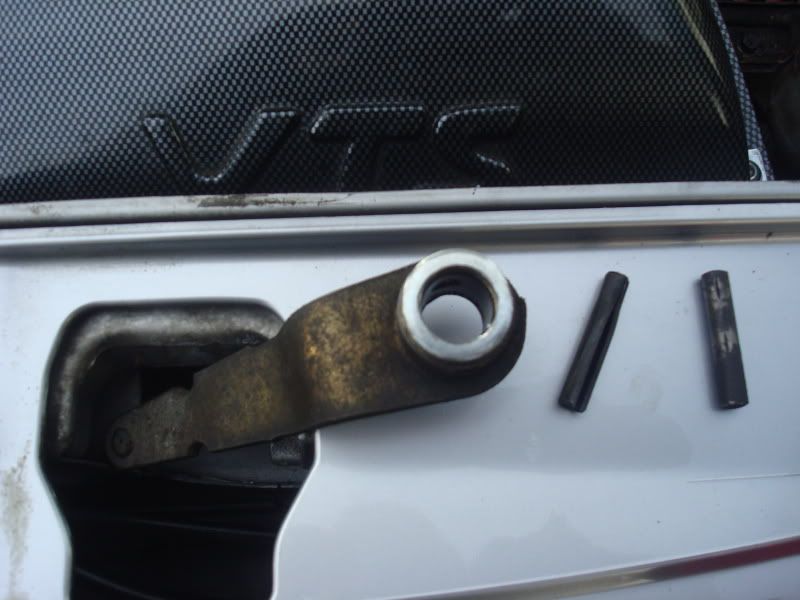
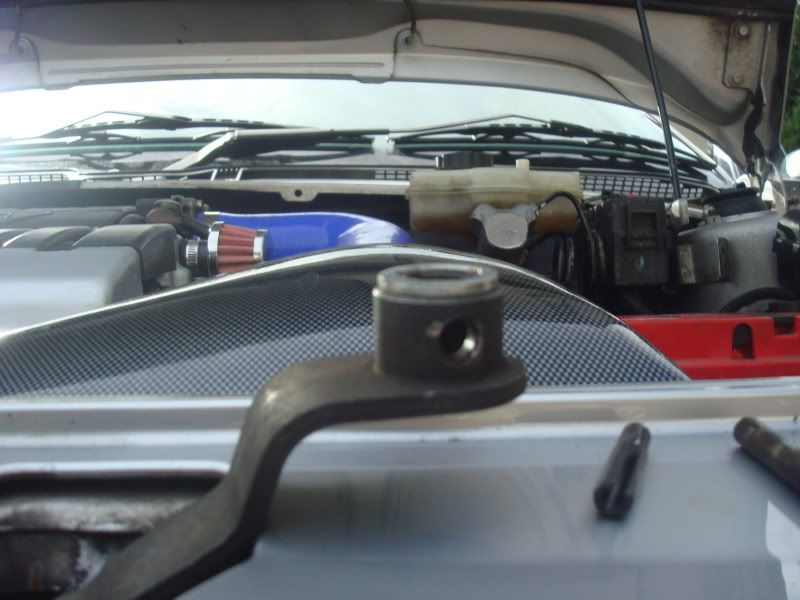
    The upper No. 4 gear rod connects to a control arm on the gearbox. This is held onto a spindle in the box by a Roll Pin, Part No. 250924 £0.32 +VAT

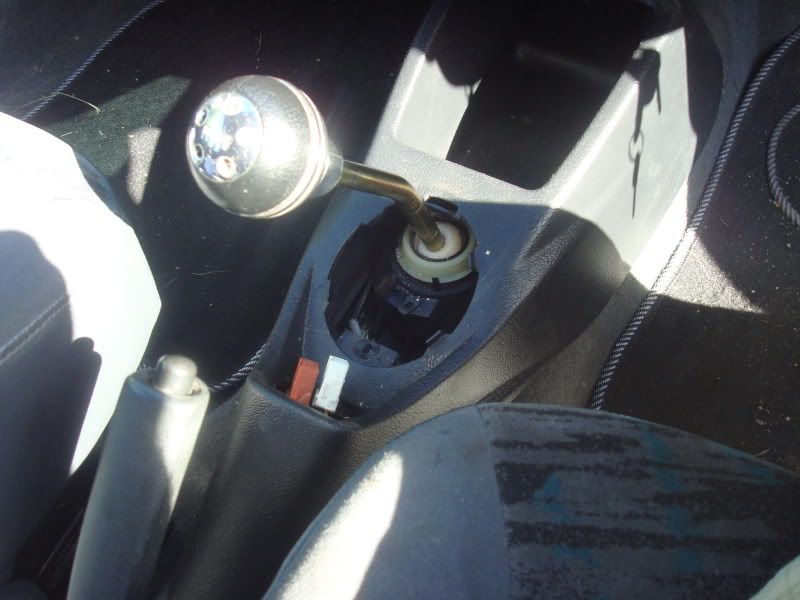
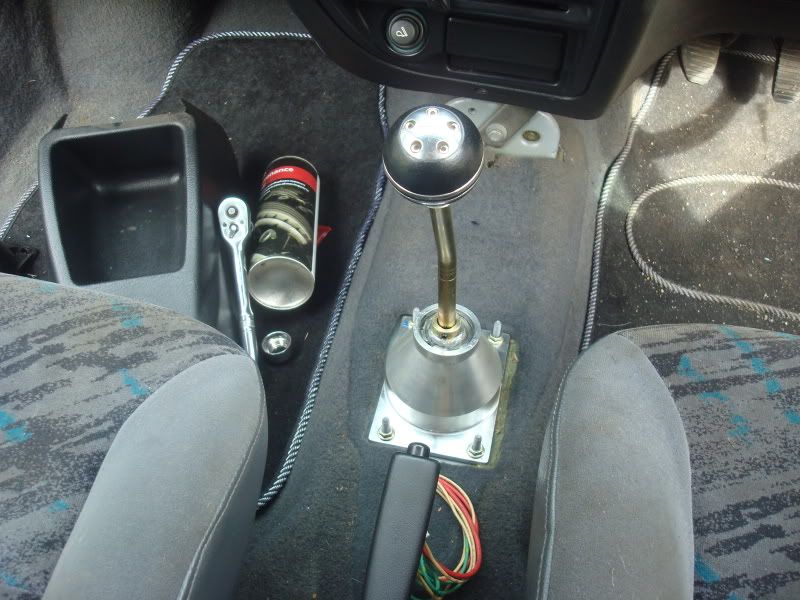
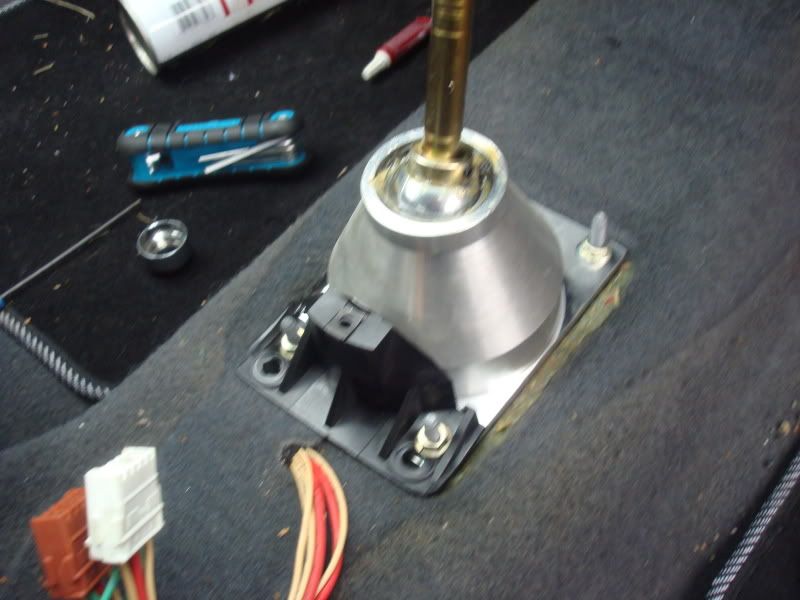
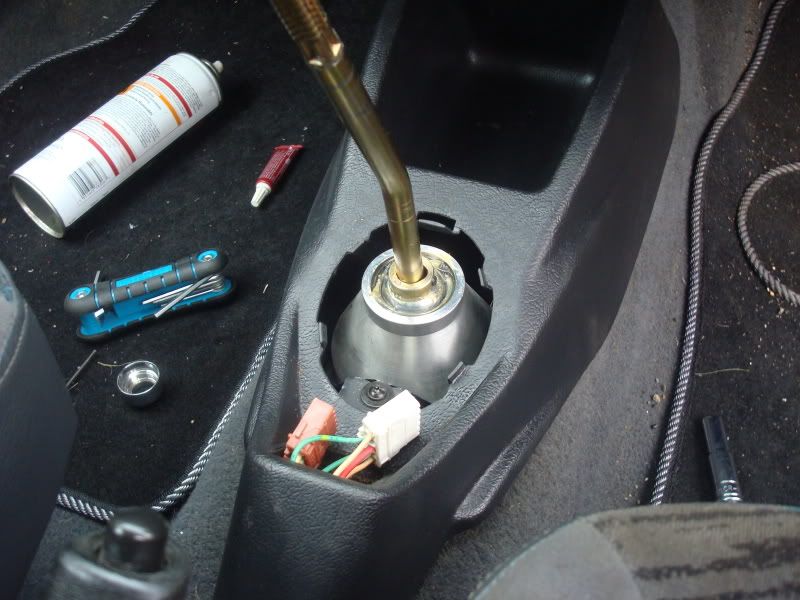
    Not normally in need of replacing, but the housing at the base of the gearstick can be replaced with a quickshift from the likes of Compbrake, GMC or, for a bit more money B&M. Although you'll be able to dramatically improve your gearchange just replacing standard items, my GMC quickshift has made my gearchange feel heavier and more solid compared to the standard housing, as well as obviously being adjustable to reduce the throw of the lever when selecting gears.

    I've replaced all of the above on my car and it's made a massive difference, my gear change literally feels like brand new, it's smooth and slick and not notchy like it was before, with no movement from the gearstick once the car's in gear at all, whereas before I could wobble it side to side. I can confidently throw it into whatever gear I feel like without worrying about crunching or missing gears now, which is just what I wanted before I took the car on track.

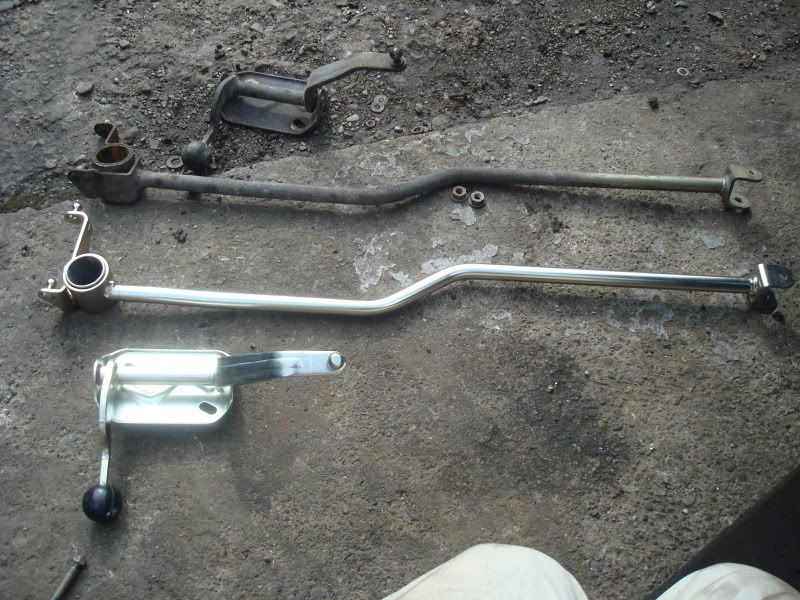
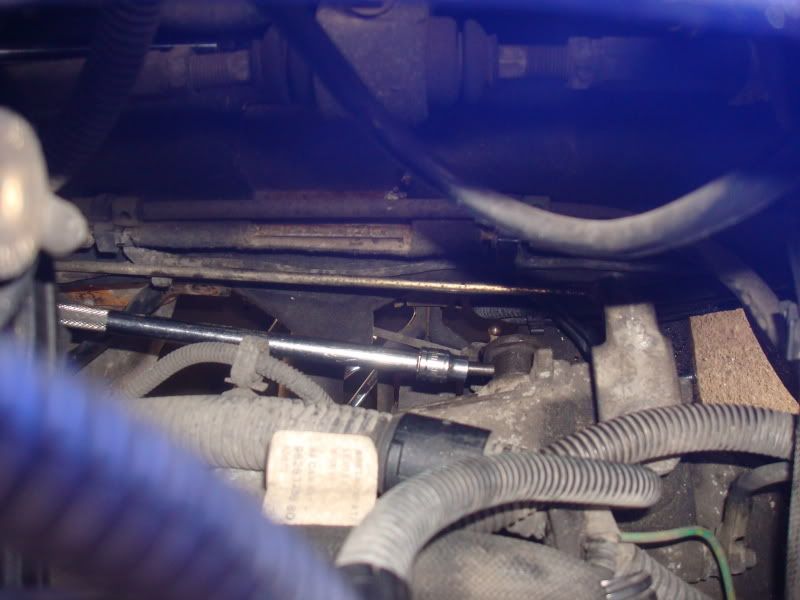
    Anyway enough talking, onto the pictures!
    12 users thanked this post: , , , , , , , , , , ,
  2. #2
    The first thing you need to do is establish what exactly needs replacing. These are the bits I fitted today, my GMC quickshift and Citroen parts. Still waiting for the uprated gear rods but they can be fitted after easy enough so won’t cover them in here.


    But you may not need all the bits I did, the only way to tell is by getting underneath and giving everything a good wiggle to see where the play is. If you’re unlucky like me and everything is shagged then you’ll need the lot!

    So to start off with, I jacked the car up to a decent height and dropped it on sturdy axle stands under each wishbone. You don’t have to do this straight away as there’s a bit to do inside the car first but it’s up to you, I like to get it out of the way at the start. You want it to be this high really so there’s room to lie under it. Make sure the car’s solid and won’t drop on you, I always chock the rear wheels and give it a rock to check.


    So inside the car:


    The gaiter around the gear stick can be unclipped from the centre console and lifted up, you can remove your knob at this point if you like but I left mine on as my gaiter had a pop button on it so I could pull it over the top. There’s a single T25 torx screw holding the console down, when this is unscrewed you can lift it up and pop the window switches out:


    With the drivers seat all the way back and the handbrake down, the centre console just slides backwards to free it from under the dash, and can be pulled out between the handbrake and the seat.


    The four 10mm nuts holding the lever housing down can be unscrewed, then the housing can be rotated enough to get at the pivot on the selector bar underneath:


    A 10mm and a 13mm spanner will undo this, don’t drop the bolt underneath the car as it’s specially fitted to the pivot bush, it’s not a normal M8 bolt. Once that’s disconnected the lever will lift out.


    If you’re replacing this for a quickshift, you’ll need to unclip the plastic locking collar.With this done the lever can be pulled out of the black plastic housing, don’t throw away the old housing though you’ll need it later. You’ll notice the white nylon ball on the gearstick, this will need removing to fit the shaft in the quickshift if you’re fitting one. I used an angle grinder as it was the closest thing I had to hand, but a hacksaw will work just as well. A cut down each side of the ball and you’ll be able to split it with a screwdriver and pop it off.


    At this point there’s not much else to do in the car, I stuck the quickshift together quickly just because I was impatient to see what it felt like, but the final adjustments will have to be made once everything else has been done.
    3 users thanked this post: , ,
  3. #3
    So underneath the car first thing I did was remove the exhaust heatshield. If you’re fussed about keeping this it’s probably worth squirting the fixings with WD40 or similar a little while before attempting to remove it, but every single stud snapped off on mine so I decided to bin the front section. I hope my Magnex system and decat won’t create as much heat as a standard system and cat so we’ll see. With the heatshield off you can see the base of the lever where it attatches to the selector arm. Mine was refitted from inside the car as I was playing with the quickshift but yours will already be disconnected here.


    So once disconnected at the back, the only thing holding the front of the bar on is the gear rods. These can be popped off their sockets using an open ended spanner:


    And the bar can then be slid off the nylon ball on the control arm:


    And pulled out forwards underneath the engine:


    The control arm is held on with two 13mm nuts, one in each corner. There is a bracing strut to the top wishbone plate that needs to be moved first, the top bolt can be removed then if the bottom 16mm nut is slackened it can be pivoted enough to allow the control arm to be unbolted and removed:


    Then there’s enough space to manoeuvre it out:


    The old vs the new, the new nylon ball fits into the new bush nice and snug with no movement whereas the old ones had half an inch of play!


    Before putting them back on, I decided to change the roll pin in the arm on the gearbox next while I had extra room. If you’re lucky and your arm has no play in it you won’t need to do this, but it wears on 99% of Saxos so chances are yours will be gone too!
    5 users thanked this post: , , , ,
  4. #4
    The roll pin is a tapered pin that secures the control arm to the gearbox. It fixes to a spindle that goes into the gearbox and then conducts some kind of voodoo magic that makes your gears work. (or so the Haynes manual says) and quite often can wear and lead to play in your gearstick. It is an interference fit which means it must be knocked in and out with a hammer and punch, simple enough as it only needs a short sharp shock to slide it out but as it’s down the back of the gearbox it’s a bit more tricky.

    Probably a hundred and one ways to do it but I used a 5mm allen key bit on a long extension to begin removing it:


    Through the gap in the passenger side wing underneath the track rod you can just about get a straight enough line to line up with the pin:


    Make sure it’s properly lined up before you give it a twat and you should get this, the old pin is ¾ of the way out in this picture:


    Once it’s completely out the arm can be slid off completely, here with the old and new pins:


    It was at this point I discovered a problem. My roll pin didn’t actually look that bad, I was expecting it to have a big groove in the middle where it had worn and allowed the arm to move, but it was actually alright. I checked again and it turned out the spindle the arm sits on was moving in and out, not the arm itself. This is a bit of a bugger as it means the main cause of the play is in the gearbox itself, not something I fancy trying to fix because of the voodoo magic I mentioned earlier.

    As I didn’t want to try taking the box apart and fixing all the clockwork inside just to get rid of a little bit of play in the gearstick I had another idea. If I could make sure the spindle didn’t have room to slide in it would take out the play almost completely and ‘fix’ the problem.

    A bit of a bodge may be, but I drilled out a thick M12 repair washer to the diameter of the spindle. If you need to do this it would be worth using a good quality washer to avoid it wearing down quickly, and you’ll need a HSS step or cone drill to do it like mine:


    The new spacer on the arm:


    The spacer slid over the spindle perfectly and it was the right size to sit in the recess the arm was sliding into to stop it moving:


    Then the arm on, the spacer was just the right thickness, you don’t want a washer too thick as you won’t get the holes to line up, and if you need to force the roll pin in the arm will lock and won’t rotate smoothly.


    The new roll pin inserted into the hole:


    And now I needed to do the same trick, a longer extension from the other side with a socket on was enough to knock the new pin into the arm:


    And it’s in! There’s a tiny bit of in and out movement but that’s only because I wanted to leave a bit of room so it could turn, it’s miles better than the good few mm it could move beforehand.


    So the worst of my problems fixed, a simple solution and a bit fiddly to do but it does the job fine.
    4 users thanked this post: , , ,
  5. #5
    So with the fiddly bit over and done with all that’s left is to refit the new bits! As I’m waiting for my uprated linkages I’ve refitted the old ones for now, but the worst of the play was in the gearbox arm, the selector rod and the ball on the control return so with those all sorted there’s a massive difference. Not even sure I needed the uprated rods, but there is a tiny bit of play still in each one so I’ll still put them on when they get here just for the finishing touch.

    So the control return arm and selector rod are fitted back together, all moving parts, cups and sockets are coated in grease just to make everything feel smooth:


    Not forgetting to refit and tighten the diagonal brace to the wishbone mount:


    The old gear rods all popped on by hand with a bit of grease, though I’ll fit my uprated ones as soon as they arrive. With everything reassembled and working fine the car can be dropped down and the inside put back together:


    The quickshift adjustment is by the two locking collars on the lever. The lever can be set at any height in the housing to adjust the throw, I played around with mine to get it how I wanted it, then when I was happy a drop of loctite on each of the grub screws and a final tightening up made it nice and solid.

    I cut the back off the old lever housing to act as the bracket for the centre console, with the housing and console re drilled it can be fitted back as it was before:


    Then window switches, gaitor and knob back on with loctite again and that’s it!


    The difference between the new and old gearchange is night and day, a massive improvement and definitely worth doing if you’re planning on track days or fast driving. I’ve never driven a Satchshift fitted car but with how this feels now I’m not sure I can see the point!
    6 users thanked this post: , , , , ,
  6. #6
    You missed out the most common course of gearstick wobble being the worn split pin on the gear selector on the gearbox.

    Williamvts made a guide on this years ago on drilling it out and fitting a larger one.

    EDIT: you're too quick with your copy n paste posts lol there was only one post there a second ago!

    Good detailed guide, will be alot of help for many people.
  7. #7
    Very good guide mate

    i really need to do this on mine, doing it however, is a completely different matter haha.
  8. #8
    Good guide dude, Was a very good read
  9. #9
    Great guide mate, need to do mine as soon as and this is really going to help
  10. #10
    Quality guide, very detailed!

    Should be a sticky!

    I should need to replace the main shaft and the ball some time soon, i'm 99% sure thats why my box slips out of gear 2 when hammering it round bends/ roundabouts.
  11. #11
    Great guide mate, another great guide like when u went into great detail wit the brembo's to try an stop my fookin squealing!! Keep it up Bud!!

    Jon
  12. #12
    Thanks guys, dunno about stickying or getting added to guides would I need to ask a mod for that? I've put it in the premium section anyway so it should stay there for a bit! Been a delay with getting my uprated gearlinkages from pug1off as the Raceland manifold I ordered them with was out of stock, but they should be arriving soon I hope!
  13. #13
    Good guide m8 
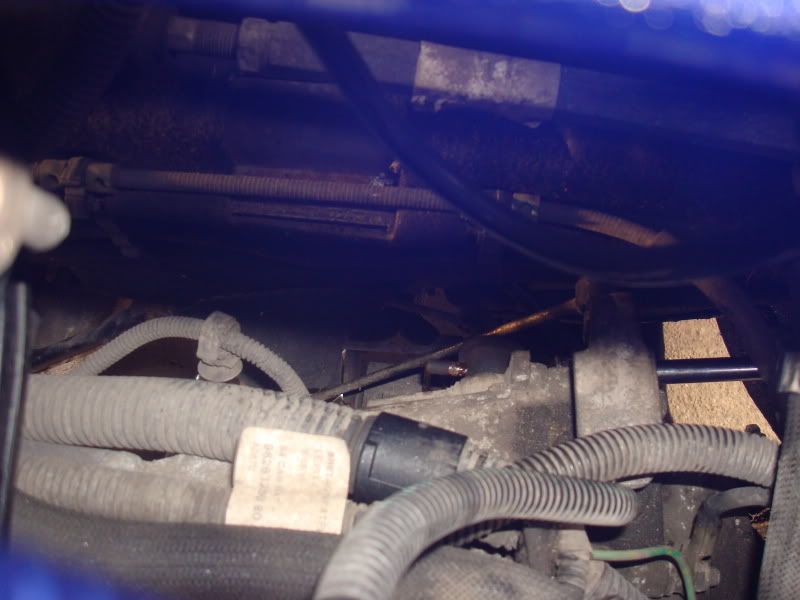
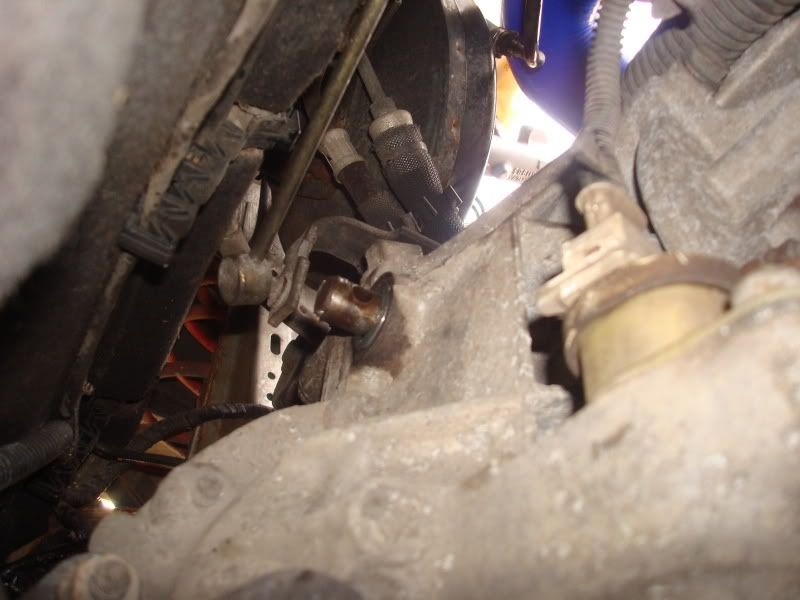
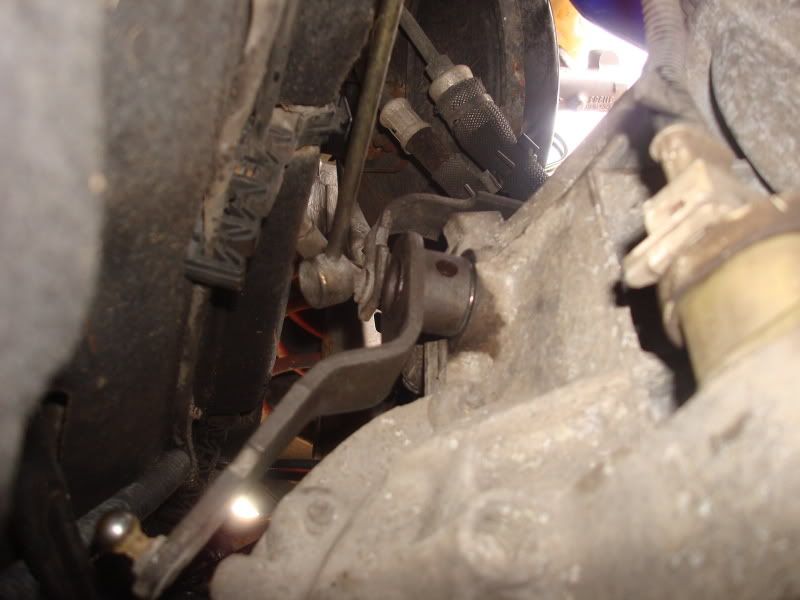
. The bit with the spacer is the most interesting part for me as I've got a leak from the selector arm like you said can move in and out (in my case a lot of movement), I'll give this a go
  14. #14
    Thanks for a great guide, made my first job a hell of a lot easier.
  15. #15
    Not sure about it leaking from that selector arm, mine was fine so I don't know how you'd go about sealing it as it needs to rotate as well. You could try siliconing the spacer in but you might find it just stops it rotating. Pleased I've been able to help a few people anyway
  16. #16
    Got a quick question regards my box actually, One of my linkages catches on the chassis of the car, Its the linkage that is above the control arm that you took off, Its connected to a arm that goes into the top of the box, What would cause it to catch the chassis of the car as makes changing gear hard unless I am speeding up at a decent speed, Could it be the lower engine mount......?

    would get pics but my photobucket ain't working
  17. #17
    Where is the best place to purchase the quickshift parts? Sounds like it's worth it and I'm looking for an excuse to do some work on the saxo.
  18. #18
    After a bit of looking around I got my quickshift from GMC: http://www.gmcmotorsport.co.uk/clutc.../prod_482.html

    And the linkages from Pug1Off:

    http://www.shop.pug1off.com/product_...00a6ebb46d12fa

    These seem to be the cheapest places to get them, the rest of the linkage parts are only available from a Citroen or Peugeot main dealer as far as I'm aware

    And as for the linkage knocking on the car I've no idea, maybe you've managed to bend one of the arms it's attatched to, if the control arm is bent back that could cause it. Mine had loads of clearance so yeah it's possible if you have a worn engine mount it's allowing too much movement, couldn't tell without looking!
  19. #19
    Quote:
    Originally Posted by db_sax View Post
    You missed out the most common course of gearstick wobble being the worn split pin on the gear selector on the gearbox.
    That's the very common cause on pugs and citroens for more time than I care to remember. I had a 305 with that problem, then a 106. Then a saxo but had to change the transmission so took care of that pin at the same time.

    Good guide
  20. #20
    Just sorted mine, Bolt at lever/linkage was loose, tightened that and it took a lot of the play out, fitted the Baker BM quickshift........what a difference, no more stretching for first, greased the rest of the linkage points and gave it a whirl. Not perfect but fitting new linkages soon so that will tighten the rest up.
  21. #21
    Just had my Pug1Off linkages through, they're not as pretty as some other ones you can get from the likes of Constella or Kam Racing, the M8 threaded bar hasn't been machined in the middle but the important bits, the cups, clips and locking nuts all look good so they'll be going on tomorrow most likely!
  22. #22
    Gonna look at doing mine now i seen a guide, nice one! (Y)
  23. #23
    Great guide will look at replacing my roll pin soon using this guide
  24. #24
    Awesome guide, my roll pin came out last night and the control arm fell off meaning I had to drive home with only 3rd and 4th gear!

    Managed to stick a bolt through to hold it for now but I am seriously considering following this guide, £100 ish to stop the gear stick wobble is worthit!!
  25. #25
    just what i needed good guide
  26. #26
    great guide mate, might have to go visit my saxo soon
  27. #27
    Is this the same on the mk 2,s
  28. #28
    should be made into a sticky really common problem and covers all cases pritty much
  29. #29
    Quote:
    Originally Posted by blackvtrt View Post
    should be made into a sticky really common problem and covers all cases pritty much
    Agreed, either a sticky or at least part of the Saxo Brakes, suspension and transmission FAQ's sticky
  30. #30
    Great guide, my nylon ball disappeared at 90+ mph comming down mondello straight (track over here) didn know what to call it and the part number helped

  31. #31
    Why isn't this a sticky?
    1 user thanked this post:
  32. #32
    Posts like this are why I joined this forum - has been so helpful in fault finding and general "how can I fix this" issues

    Dan
  33. #33
    so, just to bump this up
    i changed the roll pin and used a drilled out washer as a spacer

    how thick should it be? my washer was a standard washer thickness, whereas the one in the pic looks about twice the thickness??

    its taken away the play, but not completely. would i be better off if i did it again and used 2 washers instead of 1, so to make it thicker?
  34. #34
    Quote:
    Originally Posted by LSOfreak View Post
    so, just to bump this up
    i changed the roll pin and used a drilled out washer as a spacer

    how thick should it be? my washer was a standard washer thickness, whereas the one in the pic looks about twice the thickness??

    its taken away the play, but not completely. would i be better off if i did it again and used 2 washers instead of 1, so to make it thicker?
    If you can get the roll pin through with two washers then go for it. Are you sure the play is with the control arm and not within the box itself?

    Sent from my GT-I9300 using Tapatalk 2
  35. #35
    im not sure, but i changed the control arm first (the one with the big nylon ball) as mine was worn alot, didnt make much of a difference though

    changing the pin made a big difference though

    cheers, ill try another washer. Do you think for the sake of 30p i better get another roll pin?
  36. #36
    Now added this thread into the FAQ for this forum section
  37. #37
    Quote:
    Originally Posted by LSOfreak View Post
    im not sure, but i changed the control arm first (the one with the big nylon ball) as mine was worn alot, didnt make much of a difference though

    changing the pin made a big difference though

    cheers, ill try another washer. Do you think for the sake of 30p i better get another roll pin?
    I meant the control arm which attaches to the gearbox, i.e what the roll pin goes through.

    I would get a new pin, a few people on here have said it has made a difference.
  38. #38
    the simple way to remove all the wobble from the arm on back of gearbox where the roll pin is fitted is to just hit the arm in the cnter with the mig welder -that arm never needs removing even when rebuilding gearbox and i have never seen leakge from that seal as its so highi n the gearbox
    15seconds with the mig and problem gone forever
  39. #39
    i cant weld though
    and dont really want to pay someone to do it
  40. #40
    Quote:
    Originally Posted by devilsadvocate View Post
    I meant the control arm which attaches to the gearbox, i.e what the roll pin goes through.

    I would get a new pin, a few people on here have said it has made a difference.
    I felt no difference whatsover changing that roll pin.

    Waste of effort.

    Im just going to do what you did on your old Saxo and change the full lot.
  41. #41
    i only felt a small bit of difference. Still has play though

    i bet its all in the 108k box it still has from new
  42. #42
    Quote:
    Originally Posted by logic_guy View Post
    Quality guide, very detailed!

    Should be a sticky!
    /\ this/\ !!!!!
    Cheers
  43. #43
    Quote:
    Originally Posted by petite-voiture View Post
    /\ this/\ !!!!!
    Cheers
    It's in the FAQ which is stickied...
  44. #44
    ok, i put in a 2nd washer, and it feels quite stiff pushing the gearstick side to side

    might do it for the third time and take the 2nd washer out as i dont think it rotates smoothly
  45. #45
    actually, rather than get another roll pin and replace it again, anyone know if i can just grease up the washers to make it rotate smoothly?
  46. #46
    putting washerson is not curing the problem
    the problem is the lever is worn ,so all you are doing side loading it against the seal
    far easier just to hit it with the welder between the lever and the shaft it is on
    any garage will do it fro you for a small fee ,if you don,t have access to a welder--and its a permanent solution
    once the rubber seal or alloy casing starts wearing then your washer cure will need to be done again
    its no
    1 user thanked this post:
  47. #47
    short shifter works a treat with sloppy gear stick! oh worth a ganders see if your box has the auto short throw. ie the ball joint just a tad further up.

    ill have to sort a piccy to show.
  48. #48
    just for reference, i changed this part (no.6), the shaft sockets and it made a difference with play but mainly reduced vibration whilst accelerating.

    They cost 71p and you need 2 of them, well worth doing in my opinion.
    part no. 245052


  49. #49
    Excellent write up of how to do, also including part numbers!

    I just wanted to give my experience of my local Citroen Dealership (Evans Halshaw Stockton-on-Tees)...

    To order the parts they need to see me in person to pay via a debit card! (what century do these guys live in!?! LoL)


    They quoted me...

    2444965 - £46.03 all in
    2414A6 - £45.63 all in
    250924 - £0.41 all in


    I then called my local Peugeot dealer (Simon Bailes Stockton-on-Tees), who quoted me the same prices, but who do live in the 21st century & would be able to order the parts over the phone.

    I know who I'll be calling then!

    Cheers,
    Pete.
  50. #50
    Welcome
    In English and I do not know English so I use google translator sorry.
    Unfortunately Hungarian forum yet so here I would ask for help if you can.

    96 citroen saxo 1.1.

    Gear linkage I changed all three. Stages were difficult and it was not good for the old one. In the foregoing, I set the exact size of the new ones. Very tight and accurate but the change was 1.2 freaked goes into place. The rest is perfect. The transmission is in neutral while leaving I changed the bars. It was recommended to me in reverse, and adjust the size of the rods and then put them back, I just think it's more than the 1 "will be pushing too" vague and again at present or worse. Can I get someone to try to tanácsotmit should worsen or do I describe?
  51. #51
    great post will be doing mine in the next wk or 2 thanks
  52. #52
    can you still get these parts from citroen/peugeot dealers?
  53. #53
    Brilliant guide dude this covers everything I've been questioning gonna give it a shot tomorrow hope I get rid of that play then I can move on the the knocking noise lol
  54. #54
    Awesome guide. I dont think ive owned a saxo with smooth gear changes before!
  55. #55
    Very good stuff their ! Going to have a good look


    Sent from my iPhone using Tapatalk
  56. #56
    Orate, just wondering where I could get one off those roll pins... ? Because I have the same problem with the arm.


    Sent from my iPhone using Tapatalk
  57. #57
    Need to use this guide later on. Had the linkages replaced about 5-6000 miles ago and coming to work today couldn't get 2nd gear. I eventually got it but there was a large thud and they play started in the stick. I can select all gears but when it's engaged I can move the stick quite a lot
  58. #58
    Quote:
    Originally Posted by saxo_90 View Post
    Need to use this guide later on. Had the linkages replaced about 5-6000 miles ago and coming to work today couldn't get 2nd gear. I eventually got it but there was a large thud and they play started in the stick. I can select all gears but when it's engaged I can move the stick quite a lot
    Yeah I think I am going to have a go at this too... My gear change is very notchy and I have at least 1 1/2 of play on the lever each way in neutral not good....
  59. #59
    Excellent guide. More new parts to buy !
  60. #60
    This is something am looking to do as I have a lot of play in my unit. How long would this take someone to do as never done this before. How simple is it to do is it a mater of just un screwing the screws and other bits and taking old off and popping new on?
  61. #61
    Thanks darkslider, pictures and details helped me out yesterday
  62. #62
    nice guide mate, helped me a lot
  63. #63
    I'm having a problem with 1st and 2nd not engaging. The linkages all seem to be moving OK but where the top linkage enters the gearbox there is a cylindrical piece which looks like it has 'popped' out of the gearbox housing by about an inch. The linkage moves when the gear stick is moved but doesn't engage with anything. Can anyone give me some advice? In the picture the piece is indicated by the yellow arrow " border="0" class="tcattdimglink" onload="NcodeImageResizer.createOn(this);" alt="" />
  64. #64
    Here's a better picture the piece that looks like it's raised an inch or so out of the housing is indicated by the yellow arrow. Any thoughts?
  65. #65
    When you move the other linkage it moves in and out of the gearbox... Its meant to and chances are that your gearbox has been beaten in 1st and 2nd scourcing a 2nd hand one will be most cost effective
  66. #66
    Where can i get the nylon ball thing from? can they be bought separate or do I need to buy full part with the mettle arm on?
  67. #67
    the whole thing. 106parts.com sell them
  68. #68
    Quote:
    Originally Posted by Gandi699 View Post
    the whole thing. 106parts.com sell them
    Anywhere else other than them or is their price about the going rate for them?
  69. #69
    thats about the going rate. Not seen them for sale anywhere else in all honesty
  70. #70
    Quote:
    Originally Posted by Gandi699 View Post
    thats about the going rate. Not seen them for sale anywhere else in all honesty
    Been looking everywhere found a place local to me who does 2nd hand parts and recons but waiting for his response to see if got a good one in stock as its about half the price or less. Saying that depending on how new it is might just spend the £30 odd on new and fit
  71. #71
    Always check your local dealer, they can get all the genuine parts that 106parts do (surprisingly) plus they can discount the prices a bit as well.
  72. #72
    Updated price comparison on the two larger parts , the 'selection bar' and the 'stock control return':

    From the dealerships
    checked out both my local Citroen and Peugeot dealerships and both gave the same price for these:

    2414A7 Selection Bar : £77.86 + VAT (£93.43inc)
    244965 Stock Control Return : £41.30 + VAT (£49.56inc)

    Total for both, inc VAT : £142.99

    Seems the prices have gone up a bit over the years (compared to the OP's prices anyway) - don't know if its just my local dealerships or what but the selection bar looks pricey.

    106parts.com:

    2414A7 Selection Bar : £111.21
    244965 Stock Control Return : £59.84

    Total for both, inc VAT : £171.05
  73. #73
    106parts has pretty much ALWAYS been a fucking rip off.

    They buy parts from the dealers, add 20-50% markup, then list the item on their website.

    If you buy from them and not direct from a dealer (particularly when most dealers when you get chatting to the parts team will give you a nice discount anyway...) then you're desperate lol
  74. #74
    Good write up my vts needs doing I have all the parts req just wondering how long it takes to do
    Thanks Scott


    Sent from my iPhone using Tapatalk
  75. #75
    http://www.ebay.co.uk/itm/GEAR-LINKS...item20e67bbd54

    Here's the full set (minus the split pin) on fleabay for £120

    http://www.ebay.co.uk/itm/BRAND-NEW-...item35e54f9410

    Split pin for £4
  76. #76
    Quote:
    Originally Posted by AntscVTR View Post
    http://www.ebay.co.uk/itm/GEAR-LINKS...item20e67bbd54

    Here's the full set (minus the split pin) on fleabay for £120

    http://www.ebay.co.uk/itm/BRAND-NEW-...item35e54f9410

    Split pin for £4
    The roll pins are less than 50p from a main dealer - that's a massive rip off!
  77. #77
    Quote:
    Originally Posted by Darkslider View Post
    So with the fiddly bit over and done with all that’s left is to refit the new bits! As I’m waiting for my uprated linkages I’ve refitted the old ones for now, but the worst of the play was in the gearbox arm, the selector rod and the ball on the control return so with those all sorted there’s a massive difference. Not even sure I needed the uprated rods, but there is a tiny bit of play still in each one so I’ll still put them on when they get here just for the finishing touch.

    So the control return arm and selector rod are fitted back together, all moving parts, cups and sockets are coated in grease just to make everything feel smooth:


    Not forgetting to refit and tighten the diagonal brace to the wishbone mount:


    The old gear rods all popped on by hand with a bit of grease, though I’ll fit my uprated ones as soon as they arrive. With everything reassembled and working fine the car can be dropped down and the inside put back together:


    The quickshift adjustment is by the two locking collars on the lever. The lever can be set at any height in the housing to adjust the throw, I played around with mine to get it how I wanted it, then when I was happy a drop of loctite on each of the grub screws and a final tightening up made it nice and solid.

    I cut the back off the old lever housing to act as the bracket for the centre console, with the housing and console re drilled it can be fitted back as it was before:


    Then window switches, gaitor and knob back on with loctite again and that’s it!


    The difference between the new and old gearchange is night and day, a massive improvement and definitely worth doing if you’re planning on track days or fast driving. I’ve never driven a Satchshift fitted car but with how this feels now I’m not sure I can see the point!
    Hi there i installed the full kit now its nice and tight

    Slight problem though its a bit stiff in reverse,2,4 gear

    I greased up everything with copper grease

    Think its the nylin ball its a really tight fit

    Sent from my GT-I9505 using Tapatalk
  78. #78
    Hi there, super guide by Darkslider, has really helped with getting familiar with the process. Before I remove the old worn out control arm, regarding removing the diagonal brace to the wishbone mount, can this be done while the suspension is under load (ie, with the car on ramps) or does it need to be done unloaded with the car on axle stands, or does it make no difference?

    Thanks.
  79. #79
    Quote:
    Originally Posted by gerrankin View Post
    Hi there i installed the full kit now its nice and tight

    Slight problem though its a bit stiff in reverse,2,4 gear

    I greased up everything with copper grease

    Think its the nylin ball its a really tight fit

    Sent from my GT-I9505 using Tapatalk
    I know it's an oldish thread revival but I recently replaced my linkages and had a problem with 2nd 4th and reverse being stiff, I used moly grease on my linkages and the big ball too! Imo I think these greases as above mentioned are a bit thick strangely! I bought a tin of wd40 ptfe and sprayed it direct to the linkages and linkage ball (sorry not sure what the right name is) and its worked brilliantly! 2nd 4th and reverse have now loosened up for now, I only done this on the weekend so how long it will last for I'm not sure but on the tin it's oil and dirt repellent so hopefully it'll last until the summer and I'll spray it down again!
  80. #80
    Its quite common after removing the linkages that reverse / 4th can lock or be stiff at first...

    I put this down to the rods not being fitted correctly / at the right angle and always recommend jiggling the rods once fitted.. you shouldn't need extra grease...
  81. #81
    or buy a satchshift
  82. #82
    Quote:
    Originally Posted by flev93 View Post
    or buy a satchshift
    Could also buy a car with DSG...

    Approx £200 difference in price however from this guide to a satchshift, so this guide is great for those on a budget
  83. #83
    Have done to mine but now I am missing reverse now and again or does not lock in place sometimes pops out. I have also moved up and down but still cant get it to measure up and be happy. Also still seems fairly lose could this be the pin in the gearbox arm?
  84. #84
    Hi All,

    Is there a recommended grease for the large nylon ball for the shifter assembly?

    I have a new linkage on order and wondering what's preferred.
  85. #85
    Quote:
    Originally Posted by GravelSpec View Post
    Hi All,

    Is there a recommended grease for the large nylon ball for the shifter assembly?

    I have a new linkage on order and wondering what's preferred.
    it all depends really, I just use silicon grease for the base of the gearstick.
  86. #86
    Okay, thanks for the info. I was thinking white lithium grease on the nylon ball.
    1 user thanked this post: