How-To-Guide: Colour code and mesh a mk2 grill

  1. #1
    Here is a quick guide to colour coding and meshing a mk2 grill:

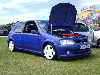
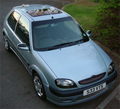
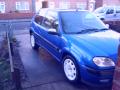
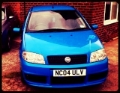
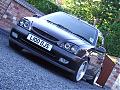
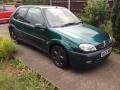
    We start off with a standard front end - looking rather boring:


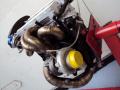
    So we remove the grill from the car, easy as pie, 7 torx head screws on the inside of the bonnet, unclip it, and remove... Then take off the chevrons...by compressing the clips on the back...


    We are now ready to start cutting out the slats... i use'd a dremel tool to get rid of the majority of the slats...(make sure you wear eye protection)


    You need to cut out nearly all of the backing but leaving the edge frame... you also need to leave to two tabs at the top on each side... as these house the mounting screws to reattach the grill to the car...


    I then decided to neaten it all up by seperating the backing from the front... in order to do this you have to drill out the plastic rivets that hold on the backing...


    I then smoothed down all exposed edges to make it nice and smooth..(beware it's a messy task)


    It is then time to sand down the front of the grill and the chevrons ready for paint... I used 1200 grit paper...


    3 Layers of grey primer was applied to the surface... allowing time for it to become touch dry and being gently sanded between layers...

    After leaving it for 24hours for the primer to dry it was ready for the first layer of paint

    Make sure you allow the paint to dry before applying another coat, and the paint should be sanded between coats to avoid the orange skin effect...

    Once three coats of paint have been applied, leave it to dry for 24hours and then it is ready for laquer...(make sure when using metallic paint that you apply Clear laquer...


    I then prepared everything ready for the mesh


    Then the mesh needs to be trimmed, leaving an overlap, you need to make sure that you don't cut off too much, remember you can trim more off but can't add anymore! You also need to trim out a whole so that you can still reach the bonnet release catch once the grill is fitted..


    Once the mesh has been trimmed down accurately and fits the backing of the grill it is time to glue gun it in place...


    Once the glue has set fit the backing back onto the front of the grill and glue gun the backing back on by regluing the plastic dowels... then refit the chevrons... IT IS NOW COMPLETE and looking thoroughly sexy...


    I will add pictures of it back on the car when it's daylight and not raining!

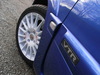
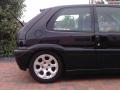
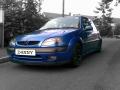
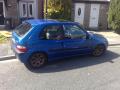
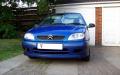
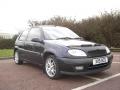
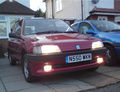
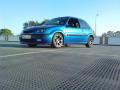
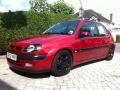
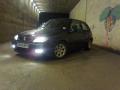
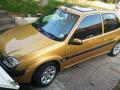
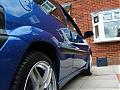
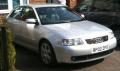
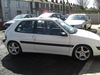
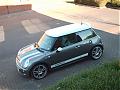
    EDIT: Here are some pictures of it on the car, once all cleaned up


    Update/Edit:

    After having the grill on my car for several months i noticed the top had started to become a little loose... so i removed it, put my standard grill back on... and set to work on sorting out the grill..

    I would now like to recommend that a glue gun is not used... or if it is used is supplemented with a different glue... as it may work loose over time... especially if the surfaces were not 100% dust free when applying....

    I used 5minute epoxy resin, that is essentially a VERY strong version of araldite... that works on anything from marble, concrete, metal and plastics...

    I peeled off the glue gun on the top of the backing, and have epoxy resin'ed it back on, and i can safely say it's not going anywhere

    If you have glue gunned yours, please keep an eye on it... as i would hate for yours to work loose....

    Hope that helps you guys!
    Alex
    84 users thanked this post: , , , , , , , , , , , , , , , , , , , , , , , , , , , , , , , , , , , , , , , , , , , , , , , , , , , , , , , , , , , , , , , , , , , , , , , , , , , , , , , , , , ,
  2. #2
    Nice one mate, quality guide! Cant rep ya but would if i could looks well smart


    P.S you get my cheque?
  3. #3
    great guide rep on its way been after this for ages i cant wait to do mine
  4. #4
    very gudddddd looks nice mate
  5. #5
    Thanks for the positive comments guys!
    Quote:
    Originally Posted by Ben_Saxo View Post
    P.S you get my cheque?
    Yes buddy, will cash it in asap.... and will pm you when the backbox has been sent out

    Cheers
    Alex
  6. #6
    Al thats a great thread, i see loads of people asking how to do this, if it was made a sticky, then that would help solve alot of these problems! top lad, i am another who cannot rep you lol, muxt have sent you some "green love" in the not so distant past!
  7. #7
    Top write up, covers everything you need to know. I have added it to the FAQ sticky thread at the top of this section.

    Mike
  8. #8
    Great stuff Al, would rep you, but have to spread it around first.

    P.S. Get some fitted pics.
  9. #9
    my bro is away back in london, but i went out and took some pics of the grill fitted for you all


  10. #10
    well done on a good job looks sex. rep coming your way, catch
  11. #11
    well thats g*y i need to spread the love sorry
  12. #12
    nice guide, i shall be following ur advice this weekend! Hope it turns out as good as urs! cheers.
  13. #13
    quality guide mate! about time someone done one!

    Thanks!
  14. #14
    top guide!
  15. #15
    christ; that car is CLEAN!

    I need to cut the slats out of my desire grille.
  16. #16
    that car is also very gorgeous
  17. #17
    that looks mint might do that with my spare MK2 grill cheers buddy.
  18. #18
    looks realy smart and clean lol you wash it before you took the picture
  19. #19
    Just washed, detailed, claybar'd, dressed and poorboys polished

    Cheers for the positive comments guys

    Alex
  20. #20
    Thanks for the guide! very very handy, and nice and simple to follow! will be doing this to mine asap!
    1 user thanked this post:
  21. #21
    Great guide. Might have a go.
  22. #22
    Followed your instructions, needed extra elastoplast for fingers! I think it turned out well. sorry for poor pic.
    great guide, if I can do it anyone can.
    http://i175.photobucket.com/albums/w...d/DSCF0006.jpg
  23. #23
    Quote:
    Originally Posted by beltandbraces View Post
    Followed your instructions, needed extra elastoplast for fingers! I think it turned out well. sorry for poor pic.
    great guide, if I can do it anyone can.
    http://i175.photobucket.com/albums/w...d/DSCF0006.jpg
    better photo.
    http://i175.photobucket.com/albums/w...DSCF0002-4.jpg
  24. #24
    Quote:
    Originally Posted by beltandbraces View Post
    thats looking good mate. how did u cut the little slats off because i dont have a dremel tool. and where did u buy ur mesh from n how much was it?
  25. #25
    I used the dremel to cut the majority of the slats... but i also used a tool that is like a mini hacksaw, but it is just a single blade that sticks out of a handle... available from most hardware stores... then filled down any sticky out bits...

    I bought my mesh from halfords at the extortionate price of £20-25... but i have enough mesh to do 2-3 grills... so i think i will mesh my standard grill and sell it on...

    Glad you found my guide useful

    Alex
  26. #26
    if u mesh your grill and wanna sell it on PM me and i will probs buy it off ya
  27. #27
    Quote:
    Originally Posted by graham_ha View Post
    thats looking good mate. how did u cut the little slats off because i dont have a dremel tool. and where did u buy ur mesh from n how much was it?
    I used a dremel, and a bit of old hacksaw blade, the mesh was in a box of bits when I bought car.
    FurioAL's guide was spot on,
    thanks
    will rep you when allowed!
  28. #28
    Sorry to bring this thread up, but brill, ill give it a go tomorow now I have eveything. Ill post some pics up then too.
  29. #29
    awesome guide mate

    good work

    anyone going to try it with a mesh grill?

    Barney
  30. #30
    Ok, i just remembered that I dont have a glue gun... any other way of fixing the mesh to the grill, or should I just chop it all out and leave it open for a while?
  31. #31
    Quote:
    Originally Posted by Global_discovery View Post
    Ok, i just remembered that I dont have a glue gun... any other way of fixing the mesh to the grill, or should I just chop it all out and leave it open for a while?
    brilliant guide i started doing this a few days ago hears the result i have not got it put on the car yet as im waiting for the glue to dry fully. to glue the mesh i tried no nails but i found that the glue gun was better as it sets much more quickley any way hers the pic
    " border="0" class="tcattdimglink" onload="NcodeImageResizer.createOn(this);" alt="" />
  32. #32
    ok well I have some stuff like no more nails but ive found it before to be better when i stuck my rear spolier onto the glass, so I think ill give it a go and if it does not stick very well, ill just leave it for now and cut the slots out and leave it with a gap for now, will be ok, would it not?
  33. #33
    Quote:
    Originally Posted by Global_discovery View Post
    ok well I have some stuff like no more nails but ive found it before to be better when i stuck my rear spolier onto the glass, so I think ill give it a go and if it does not stick very well, ill just leave it for now and cut the slots out and leave it with a gap for now, will be ok, would it not?
    the grill will have to be off the car for 3 days mate if you spraying it too coz you have to leve 24 houres between stages primer/paint/lacker ETC i have a spare grill i used while i was doing the standard 1. as for the glue i would advise you to go buy a glue gun as no nails is crap i tried it first but ended up borrowing a glue gun of a mate. hope this helps ps you could try super glue
  34. #34
    Im not going to spary it, im leaving it black as its very dark black now anyways and im happy with it :grin

    The stuff i used for the spolier is like super glue, its this spray stuff you spary on to what you want to stick, then apply the glue to it and it sticks so well!
  35. #35
    yer it should work then mate its a pritty easy mod to do and looks much better good look to ya
  36. #36
    Cheers, ill start it early tomorrow morning anyways and let you all know with pics what it goes like.
  37. #37
    great guide
  38. #38
    Awesome thread mate, i actually bought a new grille from work the other day to do this, and was wondering how to do it, so i can do it now. Plus mines allready primered lol
  39. #39
    Quote:
    Originally Posted by Richardson_VTS View Post
    Awesome thread mate, i actually bought a new grille from work the other day to do this, and was wondering how to do it, so i can do it now. Plus mines allready primered lol
    if your selling grill pm me as i cocked mine up and would like to try it again
  40. #40
    i tried to do that myself....was a challenge but came up ok i suppose. then asfter about 6 weeks it was on my car for the glue started cracking and it came apart. think im going to buy the debadged grill. its on www.espdesigns.co.uk for around £50. what do you think of it?
  41. #41
    Update/Edit:

    After having the grill on my car for several months i noticed the top had started to become a little loose... so i removed it, put my standard grill back on... and set to work on sorting out the grill..

    I would now like to recommend that a glue gun is not used... or if it is used is supplemented with a different glue... as it may work loose over time... especially if the surfaces were not 100% dust free when applying....

    I used 5minute epoxy resin, that is essentially a VERY strong version of araldite... that works on anything from marble, concrete, metal and plastics...

    I peeled off the glue gun on the top of the backing, and have epoxy resin'ed it back on, and i can safely say it's not going anywhere

    If you have glue gunned yours, please keep an eye on it... as i would hate for yours to work loose....

    Thanks
    Alex
  42. #42
    Iv got a dimma type grill on mine but im going to do this so got two grills to swop over. Great guide very helpful
  43. #43
    i glue gunned mine and it has come lose so i think i will araldite it

    were best place to get mesh from b and q works out about £20
  44. #44
    What colour is the paint mate? As my furio is exact colour.. May try it one day .. Also is it the same primer, paint and laquer you'd use for the interior?
  45. #45
    whats the difference in removing the grill when it is a 98 mk1 saxo??
  46. #46
    wen i bought my saxo the previous owner had done that to the grill and mucked it up the front part kept falling off and was not flush with the bonnet so my advice be careful wen doing this got a standard grill on mine at the mo wana get a dimma grill soon
  47. #47
    Used this today, love you Al!
  48. #48
    No problemo

    Let us know how it comes out!

    Alex
  49. #49
    just wondering, if i prime and then use a metalic spray the same as my bodywork and then a clear laquer for the grill will it come out with the same finish as the body work (like yours has)?

    Cheers
  50. #50
    Yes... halfords spray cans though are pretty much pot luck as to whether you get a good colour match...

    If you get them to make some up for you then your more likely to get a colour match

    If using metallic paint it is also important to spray the grill whilst it rests in the same way it would on the car (up right) so the flake is sprayed and will stay in the right position... as that can often lead to non colour matches...

    Hope that helps!
    Alex
  51. #51
    nice 1 mate that helps alot
  52. #52
    nice guide! been planning on doing this 2 my car for a while now
  53. #53
    thanx for the guide will b doing this soon to mine. thanx, good tips!
  54. #54
    Glad to be of service

    Alex
  55. #55
    what colour did u paint the chevrons? matt black or dark grey or soemthin? seems to blend in really well
  56. #56
    They are painted black buddy... just halfords own satin black i believe....

    Alex
  57. #57
    Great guide.

    Started it today, should be finished tomorrow. I'll post up some pics when I'm done.
  58. #58
    cant actually get the backin off??? any advice??
  59. #59
    Right had a play about with this today but ran into a few problems...

    I take it the mesh sits in the recessed edges of the black backing part and is then sandwiched between that and the front part?

    I cut the mesh so it fitted perfectly within the backing part but the far ends became a bit of a problem. The front part of the grill isn't flat at the ends, it steps out so you can't sandwich the mesh in between. What do I do here? But the mesh to it actually sits further forward?

    Hopefully someone knows what I'm on about. If anyone's got pics of one they've done here that would be great.

    Cheers
  60. #60
    you need to glue the mesh to the back of the backing, otherwise if you sandwich it between the 2 parts, when you stick back on the car it will stick out a bit
  61. #61
    Quote:
    Originally Posted by Jungle_Jim View Post
    you need to glue the mesh to the back of the backing, otherwise if you sandwich it between the 2 parts, when you stick back on the car it will stick out a bit
    Ah right. I just assumed it went in between because it looks that way in the pics. Makes sense now cheers.
  62. #62
    cheers for that alex al get some pics up once its done :d
  63. #63
    God that's clean lol. Thanks for guide i'm going to try it on my old grille !
  64. #64
    Nice guide m8 i wud du it but im 2 lazy lol so jus gona buy 1 probs
  65. #65
    Good guide m8, great help! Heres hoping i dnt mess it up lol!
  66. #66
    This looks much better than standard and saves alot of money. top guide
  67. #67
    nice guide +rep
  68. #68
    thanks mate, been looking for ages for this! top guide
  69. #69
    sorry to raise this one again chaps but when you cut the slats out do you cut the middle bit off aswell?
  70. #70
    no cut around it.
  71. #71
    cheers mate
  72. #72
    great guide, looks well nice
  73. #73
    cheers, great guide
  74. #74
    Great Guide
    Does anyone know were i can get the same mesh from ?
    FITZY
  75. #75
    Quote:
    Originally Posted by FITZY View Post
    Great Guide
    Does anyone know were i can get the same mesh from ?
    FITZY
    Halfrauds, B&Q, Focus
  76. #76
    I've managed to get another grill. just to clarify, the tabs where the screws are that you use to mount the grill are left there and you have to cut around them?

    Also the little bits that are melted down to hold everything together are ok to be ground off?
  77. #77
    nice guide mate, made it look easy enough for me to do. You've inspired me lol thanks
  78. #78
    Quote:
    Originally Posted by saxmaniac5 View Post
    I've managed to get another grill. just to clarify, the tabs where the screws are that you use to mount the grill are left there and you have to cut around them?

    Also the little bits that are melted down to hold everything together are ok to be ground off?
    i did this yesterday and got a bi confused so i just cut around the screw mounts as best i could and it worked fine, the tabs ou can't even see. also its fine to grind/cut them off.the both parts attach back together using the screws you use to put the grill back on to the bonnet so...hope it helps...hope it dont confuse you more lol or hope you havent already done it and messed it up lol
  79. #79
    btw...B&Q?what department lol is £20 for the proper stuff a good price?
  80. #80
    this really helped me out much preffered than the dimma cheers mate
    1 user thanked this post:
  81. #81
    that car is mint
  82. #82
    I think i'm possibly the only person on here that cant work out how to get the mesh to fit between the facia and the mounting bit... I've cut all round it bent the edges over but the back bit doesn't fit flush. surely this will mean the grill wont sit right on the car?

    i'm so bloody confused by it...something so simple too lol!!!!!!!
  83. #83
    Quote:
    Originally Posted by saxmaniac5 View Post
    I think i'm possibly the only person on here that cant work out how to get the mesh to fit between the facia and the mounting bit... I've cut all round it bent the edges over but the back bit doesn't fit flush. surely this will mean the grill wont sit right on the car?

    i'm so bloody confused by it...something so simple too lol!!!!!!!
    the mesh sticks to the back of the back part of the grill.if you sandwich it between the two it sticks out on the car. epoxy the grill to the back of the back part of the grill then epoxy the back part back to the front.worked brilliant for me, hope it helps
  84. #84
    sorry to bring this thread up, ive done my grille now ( didnt see the guide at the time ), but just wondering if i could get away with using superglue?

    cheers
  85. #85
    i tried this and followed the guide step by step and then when trieng put the back and the frount back together there was a gap bwt 6-8mm bwtween them and i tried press them tgether because the mesh was blocking it and i snaped it in the middle and the glue i was using was too runny so couldnt bridge the 6-8mm gap to glue them together lol

    so i think im going to buy a dimma grille instead lol

    after buying the paint and and prinmer and glue and mesh it ends up costing about £30 bit more i think.

    and then i broke it at the last hurdle gutter so take care while doing this guys.
  86. #86
    cheers mate this looks good, guna do it to mine soon
  87. #87
    On a saxo 1997 1.1 Can I mesh it or is it better to get a mk2 grill and will that fit?
    nice guide though, Thanks
  88. #88
    are you meaning you want to put a mk2 grill on a mk1??
  89. #89
    Yerh basically as i think meshing the mk1 is going to be 2 hard?
  90. #90
    it wont be hard, the same principal applies.
    and theres no way a mk2 will fit on a mk1, its a completely different body shape
  91. #91
    Ok cheers mate but it's the old mk1 grill
  92. #92
    just get a facelift mk1 grille and mesh that. thats a piece of cake to do...! look at my progress thread
  93. #93
    Like your thread! ermmm But the scrappy doesnt hav any? or should this be an ebay job? or can you get anycolour uplift grill and spray it? thanks for the help.
  94. #94
    Where can i buy some of that Black Mesh? im looking at doing mine this weekend
  95. #95
    halfords mate, its about £20 though
  96. #96
    Yeah quality guide! Looks smart toooo!!
  97. #97
    £20 for that little bit. Fuck that!!! surely ill be able to get it somewhere cheaper than that? :|
  98. #98
    great how to guide mate.i did mine the other day looks 1000 times better imo.
  99. #99
    that looks really cool mate, deffinatly suits your car because of the colour, i think i mite have to try that on my black car good thread
  100. #100
    as in the colour coding i rekon
  101. #101
    how do you get the chevrons out??? i cant get mine out :@
  102. #102
    Amazing step by step guide thanks mate
  103. #103
    exelent thread mate
  104. #104
    I started something like this a while ago but I have removed the chevrons too and fibre glassed & fillered holes (looks just like a dimma one) what I wanted to know is...

    The mesh you used looks very flat which is ideal, but myne is more 3d and i wondered how much room there is now you made it slightly thicker with the mesh?

    I have cut my backing piece to bits but dont think i should have! Shouls I just tiger seal it in place?

    Has anyone attempted a home made dimma grill before?
  105. #105
    on to painting now i must be the worlds worst painter very orange peeley
    i used 90 sec aroldite to stick the back on and its suppost to be water proof but when i came to wash it ready for painting its started to come loose. but i have a selent thats like tiger seal that im going to run all the way around the edge so hopfully that will help
  106. #106
    nice one was thinkin about this for my vtr
  107. #107
    I did this but I got a bit carried away and had the chevrons off too, didnt come out too bad though!?


  108. #108
    im having a problem meshing mine, some help off someone would be great... The mesh will make the grill thicker making it not sit flush with the bonet, so ive been told to mesh the back, but this will have the same affect??....
  109. #109
    this guide is excelent,let the project begin
  110. #110
    jus gotta hope its all straight forward
  111. #111
    Quality guide. very easy to understand, i will be doing that to ma car asap!
  112. #112
    great guide im going to have a go at this tomorow on mine and see how it gose will let you no and il probz be askin loadz of questions if i get stuck haha cheers (Y)
  113. #113
    well i got it off alrite and cut all the slats out fine and cut the mesh to size, i primerd the surroundin and colour coded it same as my car and left it to dry over night... all iv got to do today is glue it in place and laqer the surrounding and fit it back on my car jobs-a-gooden !!
  114. #114
    Looks class mate, gonna get a few spares from a breakers near me and give it a go i think! Cheeers!!
  115. #115
    lmao that dint go to plan, it now dosent sit flush with the bonnet so looks like im guna have to buy a dimma grill or get a standard 1 bak lol
  116. #116
    nice! i'm going to be doing this. weird how it makes yer car look that much better
    cheers for the guide man!
  117. #117
    gonna grab a grill form the scrap yard n give it ago. good guide!!!
  118. #118
    nice guide!!!
  119. #119
    Hey Al want to do mine lol ill pay you?
  120. #120
    i used this guide a while back encountered some problems, but this was a massive help
    thanks
  121. #121
    top guide mate! decided what im gonna do today now, this guide will be a massive help thanks
  122. #122
    that looks fookin rudeee mate
  123. #123
    looks easy at first.. but it's not!!

    i cut my hands with the mesh and now it wont fit flush with the bonnet..

    apart from that.. top guide, but not for the simple minded.
  124. #124
    Nice, want to do this to mine, where did you get you wicked red paint to match the car? Dont know whether to trust halfords lol
  125. #125
    hi i was just wondering wer u got the spray eg primer, laquer n paint i herd somewer u can get um at halfords but how much an wot primer would i have t use for a posi blue grill thx btw gr8 guide
  126. #126
    nice guide matey followed it to a tee and its come out mint and fits loveley

    By the way all if you get your mesh from halfords at 25 nicker cut out the grille piece as small as you can get away with and afterwards you can de slat the front bumper leaving just the bar in and

    you will have enought mesh left to mesh that aswell thats what i did if you like that sort of thing

    one last hit the mesh with some lacqure for that extra shiny effect if you like
  127. #127
    cool awsum guide am soo gonna do this to my saxo. it looks sweeeet lol
  128. #128
    great guide...thinking of doing this soon....thanks
  129. #129
    Thats an awesome guide mate 5/5
  130. #130
    used this guide to do mine last week, really happy with the results. Cheers again buddy top guide!!!
  131. #131
    I will give this a try but I think I'll find a spare grill piece lol
  132. #132
    I'm just finishing mine off 2nite when I get my more paint. Just got the mesh to be painted & then glued. Job done. It's looking good tho!
  133. #133
    might seem daft but is halfords the only place that sells the mesh??? top guide cheers matey
  134. #134
    i think you can get mesh from b&q or diy store...
  135. #135
    Hi i recently did my grill and it seems a little patchy like u can see on one side that it has run a bit. Do u think i should do this again and what if anything did i do wrong.
  136. #136
    any advise
  137. #137
    Maybe too much paint. When I spray RC planes I use the stuff very sparingly. Best bet is get a airbrush sort of thing pros use. Covers it in the right amount
  138. #138
    nice one unsure of weather to spend£40 on a sports grill after reading this
  139. #139
    is there anyone is the cumbria region that can do this ? dont fancy doing it myself !

    PM if so.

    Cheers
  140. #140
    thanks just what i was looking for mate.
  141. #141
    Does anyone think its possible to get the slats out with a chisel?
  142. #142
    Wow this is ace! It looks MUCH better
  143. #143
    very nice mate good job
  144. #144
    What other tools can be used to remove the slats? Would a hack-saw blade work?
  145. #145
    did this today, not got a dremmel so i used a junior hack saw (the small ones not for kiddies lol)and some precision clippers the kind used for models and stuff. very possible takes about an hour and a half and needs to be done fairly carefully but is entirely possible. finish is not very neat so will need to sand down sharp edges. looks the real nice when done
  146. #146
    Just done this myself, looking really neat, but after having it on the car for a while its not flush to the bonnet, seems the glue isn't holding very well. I used araldite, but found it hard to get a solid position to glue and have it still flush, right pain in the arse.. why I would also recommend using a dremmel bit to be more accurate. Don't know if anyone has had the same problem and overcome it?

    Ta
  147. #147
    i just done mine too doesnt sit perfect because i didnt seperate front and back just glued it to back and all the araldite.. well most of it got crushed off when fitting. will redo it with the mesh i have left in the spring by seperating the two parts and using epoxy or fibre glass
  148. #148
    I'm still unsure were the mesh is glued? Is it in between the front and backing? or on the back of the backing?

    I need to get this right as i've spent alot of time on it, helpful advice would be appreciated greatly!
  149. #149
    Thanks for this
  150. #150
    thanks that will help loads!
  151. #151
    Where did you get your black mesh from mate? thanks alot!
  152. #152
    wicked mate. iv noticed that most grills are really faded. this should help
  153. #153
    brilliant mate been wanting to do mine great guide wanna give it ago but sure i will fcuk it up .... yours looks proper mate good job
  154. #154
    very handy guide mate
  155. #155
    this has to be one of the best guides on here work done mate
  156. #156
    great guide mate!!! been doing mine today, its all primered ready for the mornin lol!
    not got any mesh yet though? does anybody know if b and q sell it?

    cheers!!
  157. #157
    Quote:
    Originally Posted by ManGo-SaXo View Post
    I'm still unsure were the mesh is glued? Is it in between the front and backing? or on the back of the backing?

    I need to get this right as i've spent alot of time on it, helpful advice would be appreciated greatly!
    i have not got round to doing my front grill yet but looking carefully at the last few pictures it looks like the mesh has been glued inbetween the two parts. hope this helps
  158. #158
    very good guide mate
  159. #159
    Nice guide the car looks miles better with the mesh grille, might have to do mine on a nice day
  160. #160
    brill guide
  161. #161
    Anyone seen saxo in stockport?
    503hp. Racing subarus and beatin em!
    send me msg if u hav
  162. #162
    Does anyone know if I can put the back off a meshed grille off ebay (without badge) onto my standard grille after i took the back off, as i bought one off ebay with out the badge and I decided i liked my colour coded one with the badge but want the mesh.
  163. #163
    great guide gunna do mine this week just waiting for resin and the mesh to be delivered

    how do you upload pics and will post some when im done
  164. #164
    will be using this guide soon thankyou
  165. #165
    guy starting mine tonight got mesh resin paper primer paint lacquer

    my vtr is iclandic gray i got crome mesh, am colour codeing grill but dont know if i should leave chevrons crome or paint them black ??? what you think
    my headlights are standered atm but might smoke or colour code them later on

    NEED OPINIONS QUICK GUYS
  166. #166
    improves the looks so welll
  167. #167
    Proper helpfull thread, just wanted to say thanks. Looks awesome, i did mine a few days ago and its turned out nicely!
  168. #168
    good thread thanks
  169. #169
    great thread might have a go at this in the mornin

    scotty r
  170. #170
    guide looks awsome gunna do mine on weekend.

    can you get wicked red vtr pain from halfords? do they sell the actuall colour?
  171. #171
    was just wondering if there will be any problems if you dont use the mesh?
  172. #172
    Great guide doing mine soon will come in helpful

    Quote:
    Originally Posted by MichieVtr View Post
    was just wondering if there will be any problems if you dont use the mesh?
    Think it would be safer to use mesh
  173. #173
    ok thanks for the reply mate
  174. #174
    this guide was brill mine worked 100%
  175. #175
    Nice tut, im going to do this tomorro.

    Thanks
  176. #176
    great guide pal, hope t do this soon
  177. #177
    Great guide mate
  178. #178
    Helpful guide, Top man
  179. #179
    that looks nice may give it ago
  180. #180

    I follow this guide turned out like this, pretty happy really
    Thanks a bunch mate
  181. #181

    I follow this guide turned out like this, pretty happy really
    Thanks a bunch mate
  182. #182
    hope someone can help, I've got a mk2 saxo and I want to de slat the grill but don't want to colour code it and I would rather not split the two section, I've cut the bottom section but I just can't seem to work out where I need to cut at the top in order for it not to show but so I can still attatch it, is there any chance someone could help with maybe a picture, any help much appreciated, jason.
  183. #183
    is it just my computer i cant see the pictures in this guide :s
  184. #184
    awsome guide,cheers
  185. #185
    Ok, now I see you leave a gap in the mesh so you can open bonnet. In silver it will be very visible I guess ? My VTS is black so I want silver mesh. Anyone with the silver mesh pictures?
  186. #186
    I did this but my glue wore off and my grill flew offand smashed all over the road. So I repainted it and its coming loose again, any one got a link to some strong glue!?!
  187. #187
    Quote:
    Originally Posted by Lukus-vtr View Post
    I did this but my glue wore off and my grill flew offand smashed all over the road. So I repainted it and its coming loose again, any one got a link to some strong glue!?!
    You can use some of the Two Component Epoxy Adhesives. It won't loose again!
  188. #188
    I've found what I'm doing at the weekend. thanks
  189. #189
    I did buy some 2 part epoxy resin I'm not too sure how to apply it when its mixed.
  190. #190
    Fudge me, how the hell do you do this and get the grill to sit flush? Mine is stuck out so far...
  191. #191
    might give this ago sometime soon! looks alot better afterwards
  192. #192
    i found a better way of mounting it, to prevent it sticking out so far.

    Get the little cutting tool and cut the middle parts out without separating the two parts of the plastic grill then place it back in the bonnet and fasten the mesh on the back with the screws.
    It sits flush so looks allot better in my opinion also allot easier
  193. #193
    Great guide where did you get your lights fromt they look awesome with your grill ???
  194. #194
    nearly finished my grill and i cant wait to get it back on my car thanks for the guide
  195. #195
    Good guide mate I didn't really need a guide tbh but guys instead of cutting a price out to open a mk2 bonnet, just do slits like a 'n' shape so u can just bend the piece and then bend it back if u get me? Can't even tell it's got a slot in it
  196. #196
    Just be careful when opening bonnet as mesh can be sharp don't wanna cut your pinky lol
  197. #197
    Great guide
  198. #198
    Great guide, cheers buddy.
  199. #199
    Mate this is egsactly what i want to do with my grill! how much did you get your dremel tool for? is it worth buying one for the job or can you use other tools??
  200. #200
    I saw this on another thread, by UKtom i think, instead of using a halfrauds rip of mesh, he used a disposable bbq. A nice cheaper alternative, and looks just the same
  201. #201
    thanks for this thread. gave me a great idea for my grill... ive taken the slats section out and rubbed it down... primered it and sprayed it black... and the rest ive done same color of car lol... half way through it..

    pics of final product to follow


    thanks for the tut guys
  202. #202
    Alright mate, I know this is an old thread but this is my next task. This guide is useful, cheers. I'm just wondering if the mesh you used was the black plastic mesh or was it painted steel?
  203. #203
    i know this is an old thread, but how would you get at the bonnet release catch with a meshed grille please? thanks in advance!
  204. #204
    The ones that you could buy meshed, have a little cut out where you can still access it.
  205. #205
    Quote:
    Originally Posted by sri_130 View Post
    The ones that you could buy meshed, have a little cut out where you can still access it.
    <br><br><br>Like this one: https://www.ebay.co.uk/itm/264858671882<br><br><br>Sent from my iPhone using Tapatalk
  206. #206
    Quote:
    Originally Posted by gavinj44 View Post
    <br><br><br>Like this one: https://www.ebay.co.uk/itm/264858671882<br><br><br>Sent from my iPhone using Tapatalk
    <br><br><br>https://www.ebay.co.uk/itm/264858671882 <br><br><br>Sent from my iPhone using Tapatalk